GravityView review: what is it? What it does Is it worth buying?
Forms of gravity It’s one of the most popular WordPress form plugins, in large part because it’s incredibly flexible (our test). You can use it to create almost any type of form, from a simple contact form to payment forms, registration forms and everything that tickles you.
However, in Gravity Forms you will not be able to see all the information collected before your site. This is a problem because the collection of information is not sufficient for certain types of forms. You also need a way to show them to your visitors.
This is where GravityView comes in. GravityView allows you to display Gravity Form form inputs in many different ways before your site.
For example, if you have an event log where people can submit events using a severity form form, you can inherit these event submissions and automatically display them in front of your site so that visitors can search for them. The possibilities are endless.
Below, I’ll tell you more about what this plugin does and what you can use it for. Then I’ll show you how everything works on a live WordPress site and share my latest thoughts on the plugin.
Let’s dive into …
What does GravityView do?
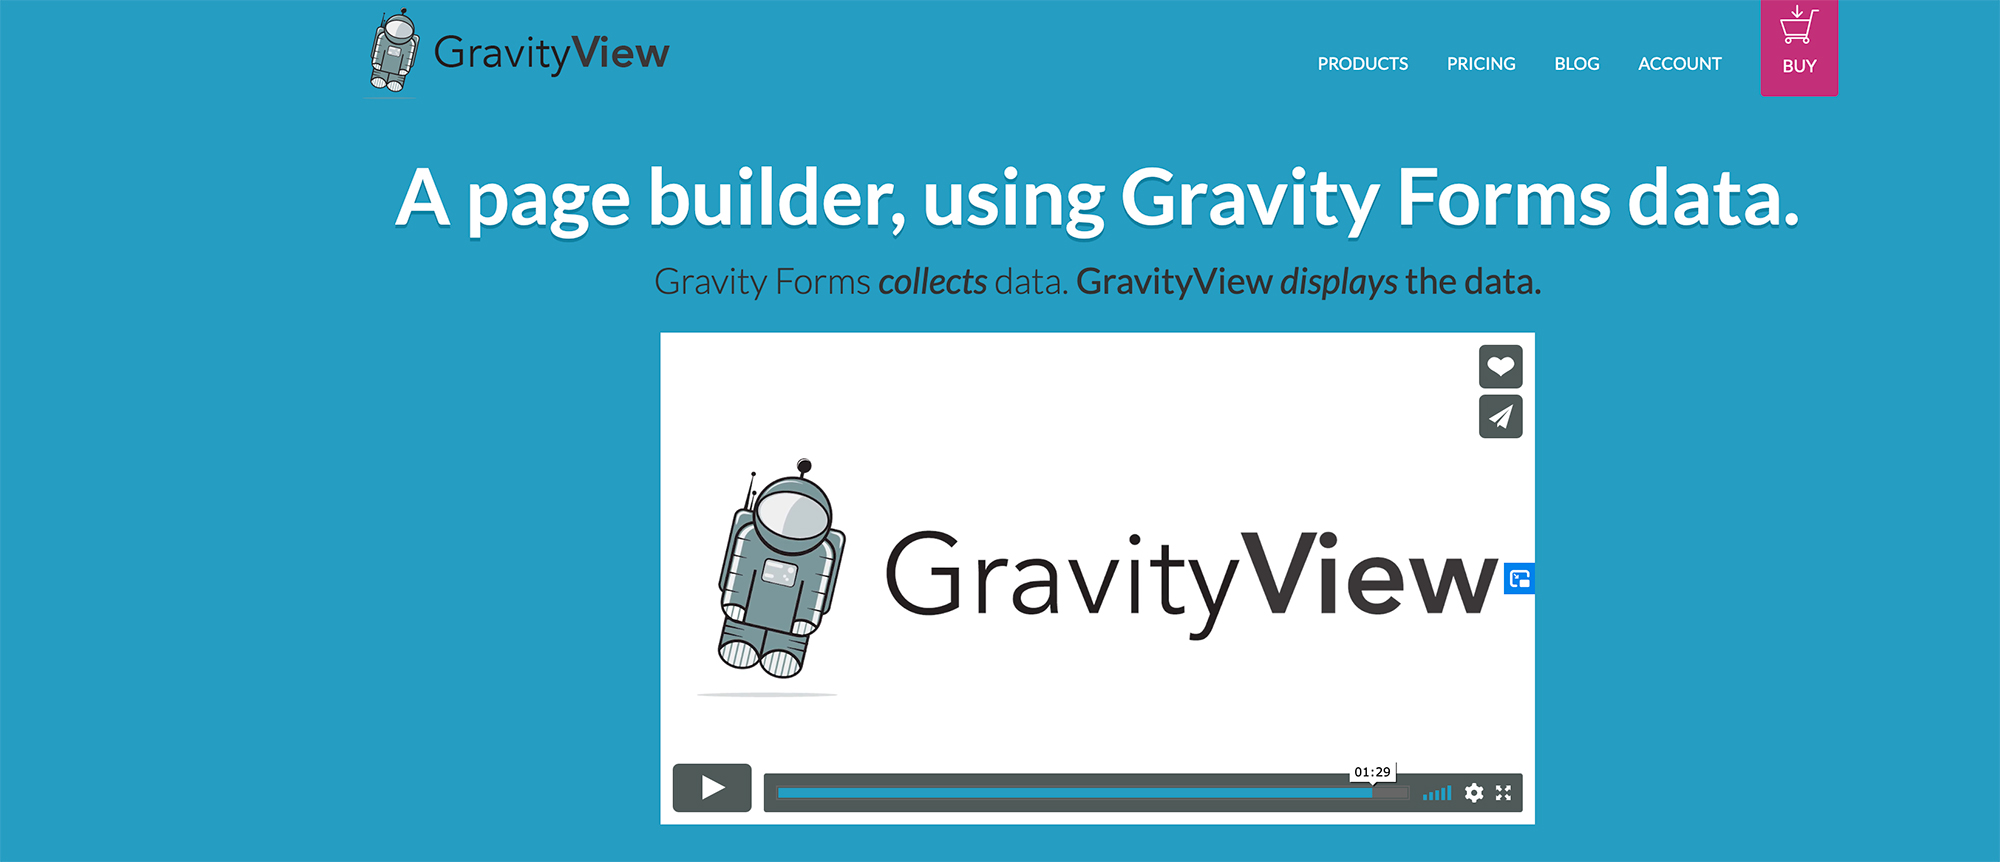
The GravityView slogan on their website is a very good explanation for their high-level value proposition:
“Gravity Forms collects data. GravityView displays the data. ”
This means what I have explained before: you can extract data from your Gravity Forms logs and display it on the front of your site.
To control how this data is viewed, GravityView provides a drag-and-drop layout generator that allows you to control the output of your data using widgets. For example, one widget may display data in a specific form field, while another widget may display a search box where visitors can search all records.
You can include all kinds of form data in your layouts, including images, video, audio, classification, and more.
You can also choose from several design options, including:
- boards – both simple and extended tables with a Data tables Integration.
- lists – I like the page that shows your blog posts, but you can check the design of each form post.
- Google Maps – View shape presentations on a map. Ideal for physical location directories. For example, you can list rental apartments on a map and submit new apartments through Gravity Forms.
- calendar – View entries in a calendar view. Ideal for the event library mentioned above or for any type of date based site.
To make it easier for visitors to navigate the data, you can add search, sort, and front-end options.
Finally, you can allow users to edit their own Gravity Forms logs on the front of the site, and even track revisions of those logs. You can also limit which form fields can be edited on the front end.
What can GravityView be used for?
Because Gravity Forms is so flexible, you can use GravityView in many different ways.
The biggest use case is probably any type of directory site, like:
- business
- Physical locations
- persons
- events
- Digital information
- etc
You can use Gravity Forms to allow users to submit records to their library. You can even charge for ticket shipping using the payment functionality built into Gravity Forms. Then you can use GravityView to automatically create the frontend database from these transfers.
However, the GravityView blog also describes many other interesting use cases. Two of my favorite examples are:
So if you get creative, you can’t use GravityView for folders only.
This is how GravityView works on a real WordPress site
Now that you understand what GravityView is helping you, I will show you how everything works.
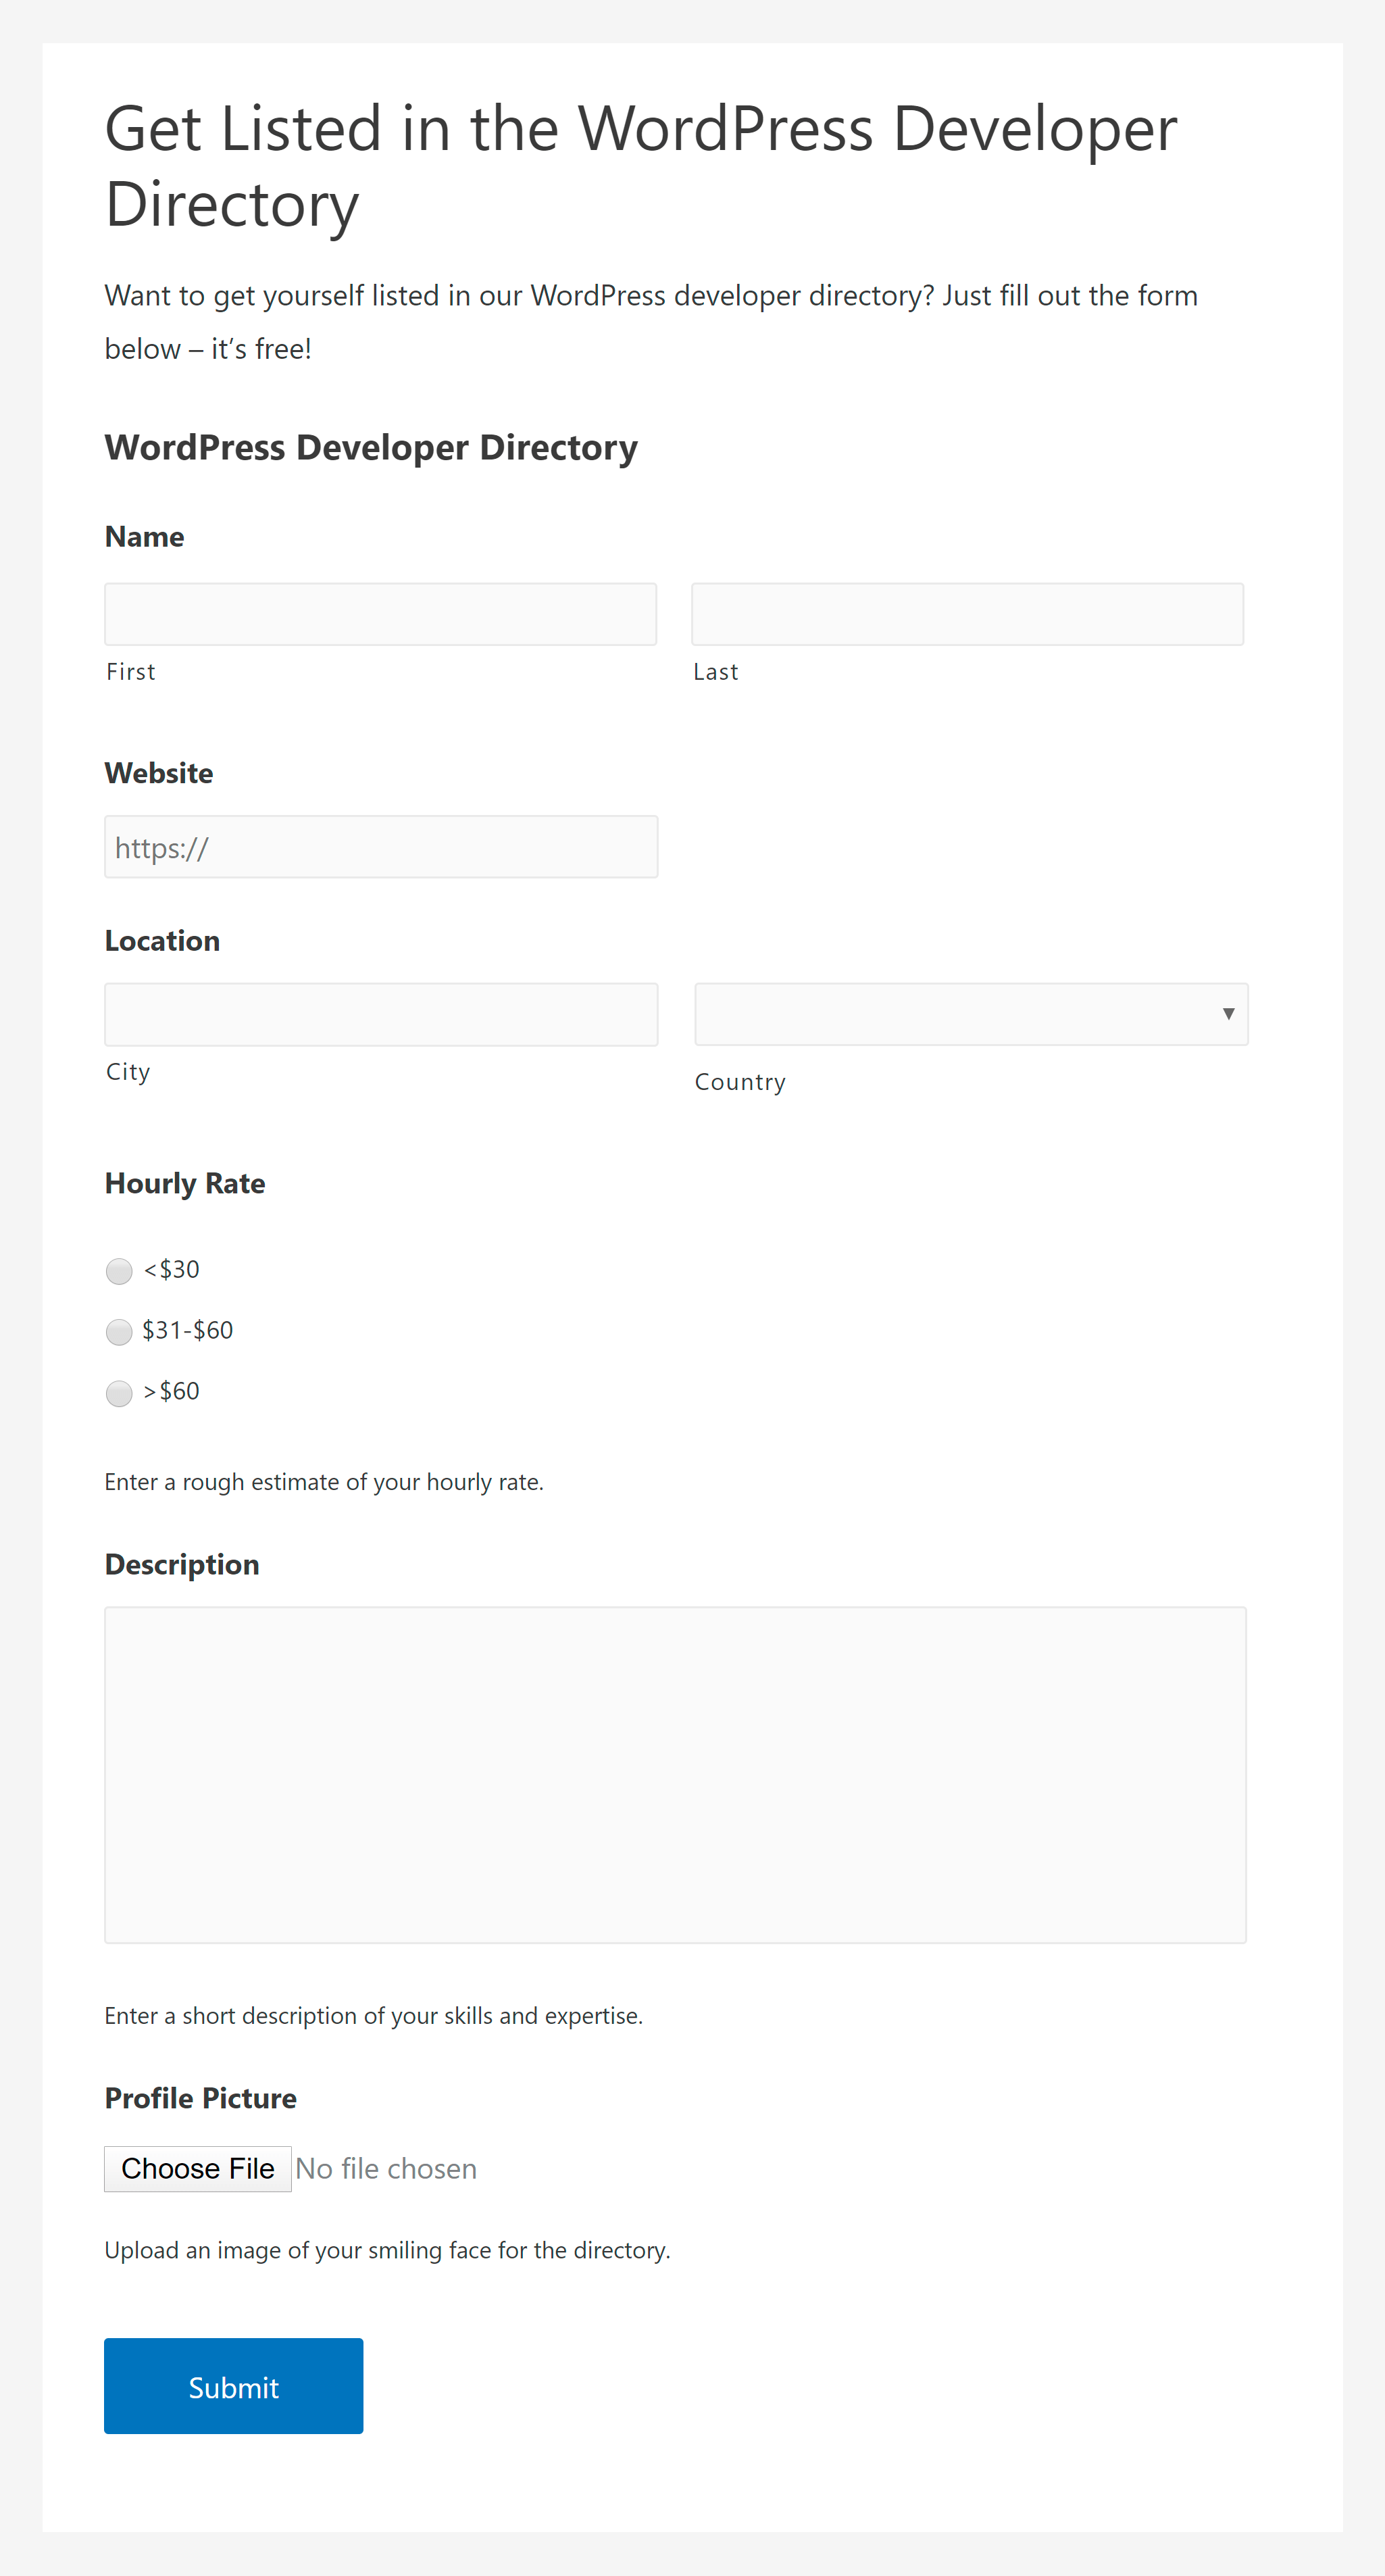
It all starts with a shape. Before installing GravityView, I used Gravity Forms to set one up.
I chose the example of a WordPress developer directory. If a developer wants to be included in the library, they can use the form to send their data.
In this example, you can do this for free. Please note, however, that you can easily charge people for the privilege using Gravity Forms’ payment fields. You can also allow people to create a list for free, but it charges them for a sponsored list.
Once you receive this form (and some of the entries I’ve submitted), we can see how GravityView is used to display this information on the front-end.
Create a new view
As the name implies, a specific front decoration for your items in Gravity Forms is called “view”.
When you create a new view, you can select two different sources for your data:
- A preset shape – Use a preset GravityView template form instead of one of your existing forms. Includes templates for business folders, user profiles, job boards and more.
- An existing form – Choose one of your existing gravity forms. I will do this for this review as I have created the form above.
Once you have selected your data source, you can choose yours screen type. This more or less defines the front-end design for your data. In the main version, you can choose between table or list See You can also add the mentioned card and calendar designs through plugins:
In this example, I select a list view.
Check your screen layout
Once you select a data source and a layout option, you can use a drag and drop generator to control the current layout of your view using widgets.
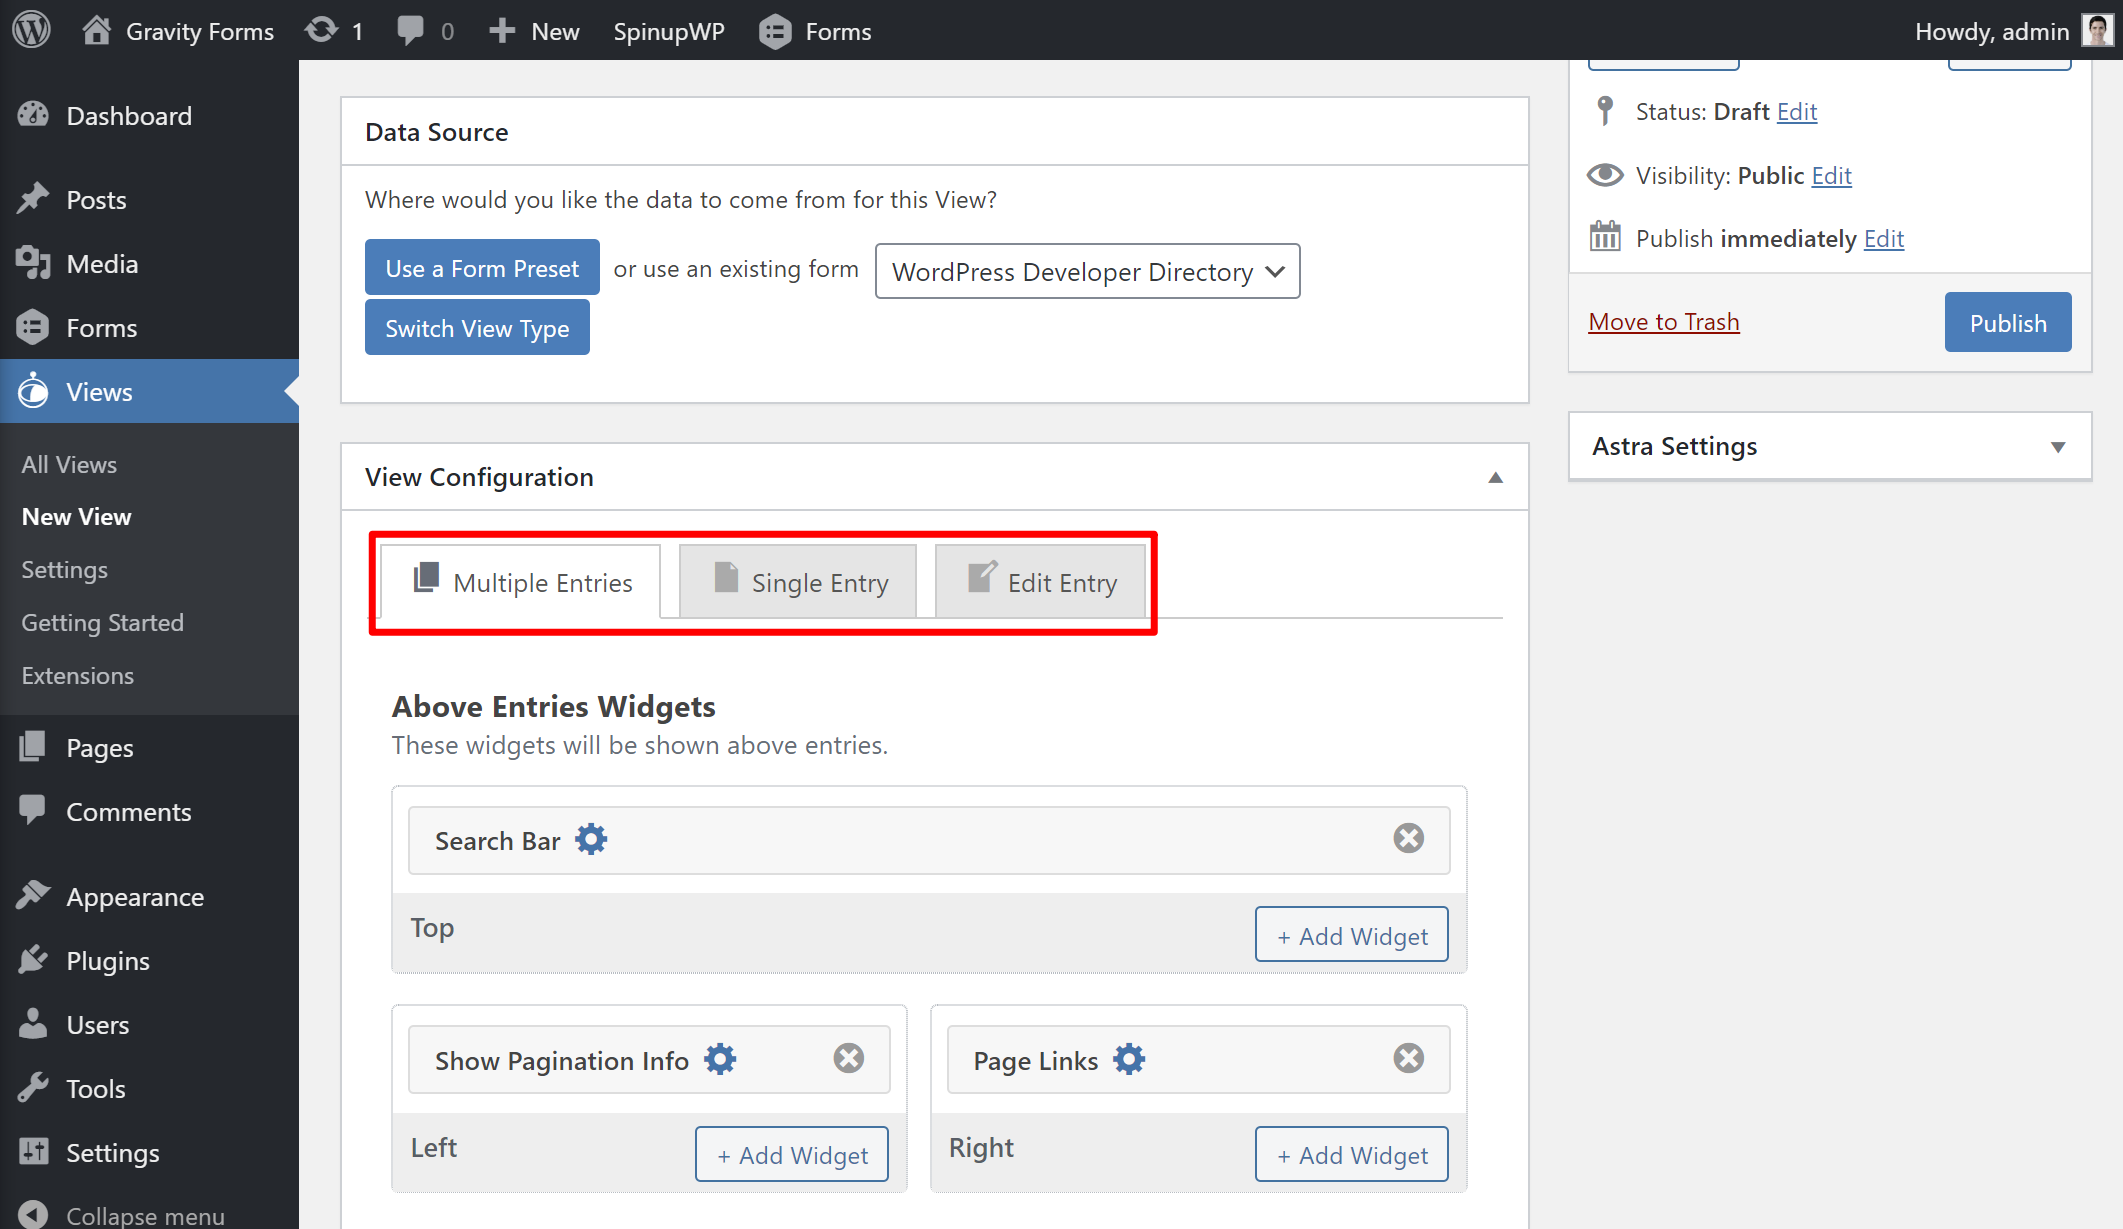
You can design a total of three pages:
- Multiple inputs – This template manages the list of all the elements in Forms of gravity.
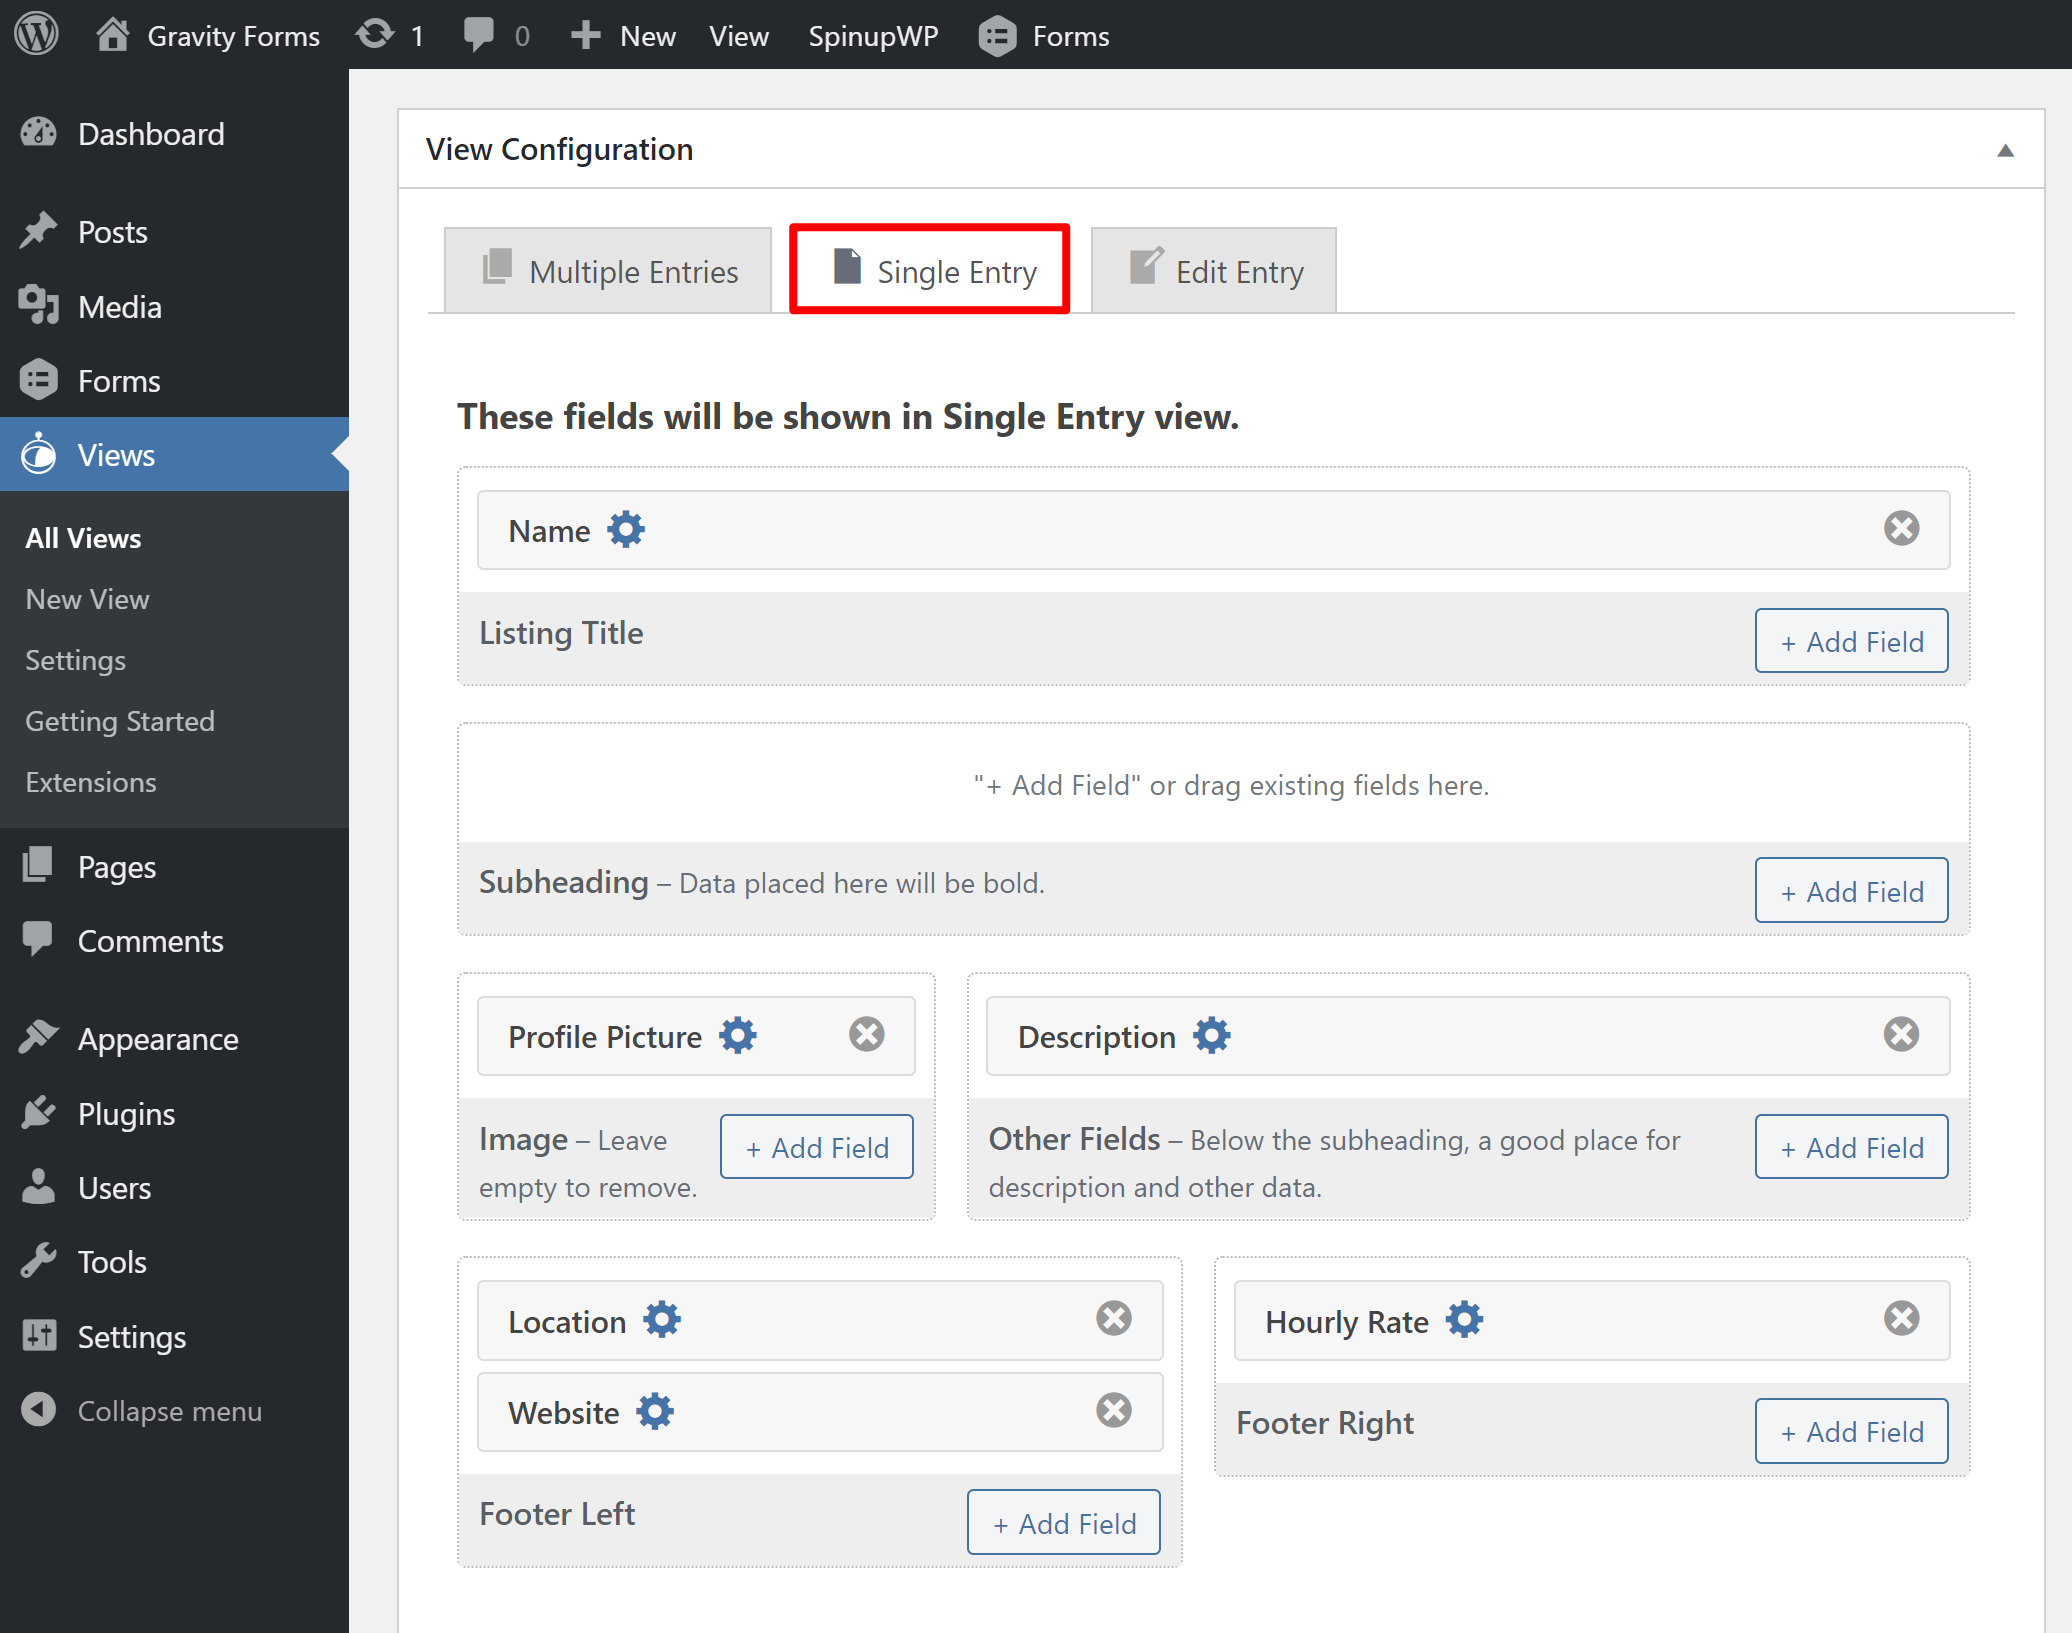
- Single entry – This template directs the page dedicated to a single entry. Users often navigate to this page from the multiple entry list.
- Edit mail – This controls which fields can be edited through the user interface.
More ticket templates
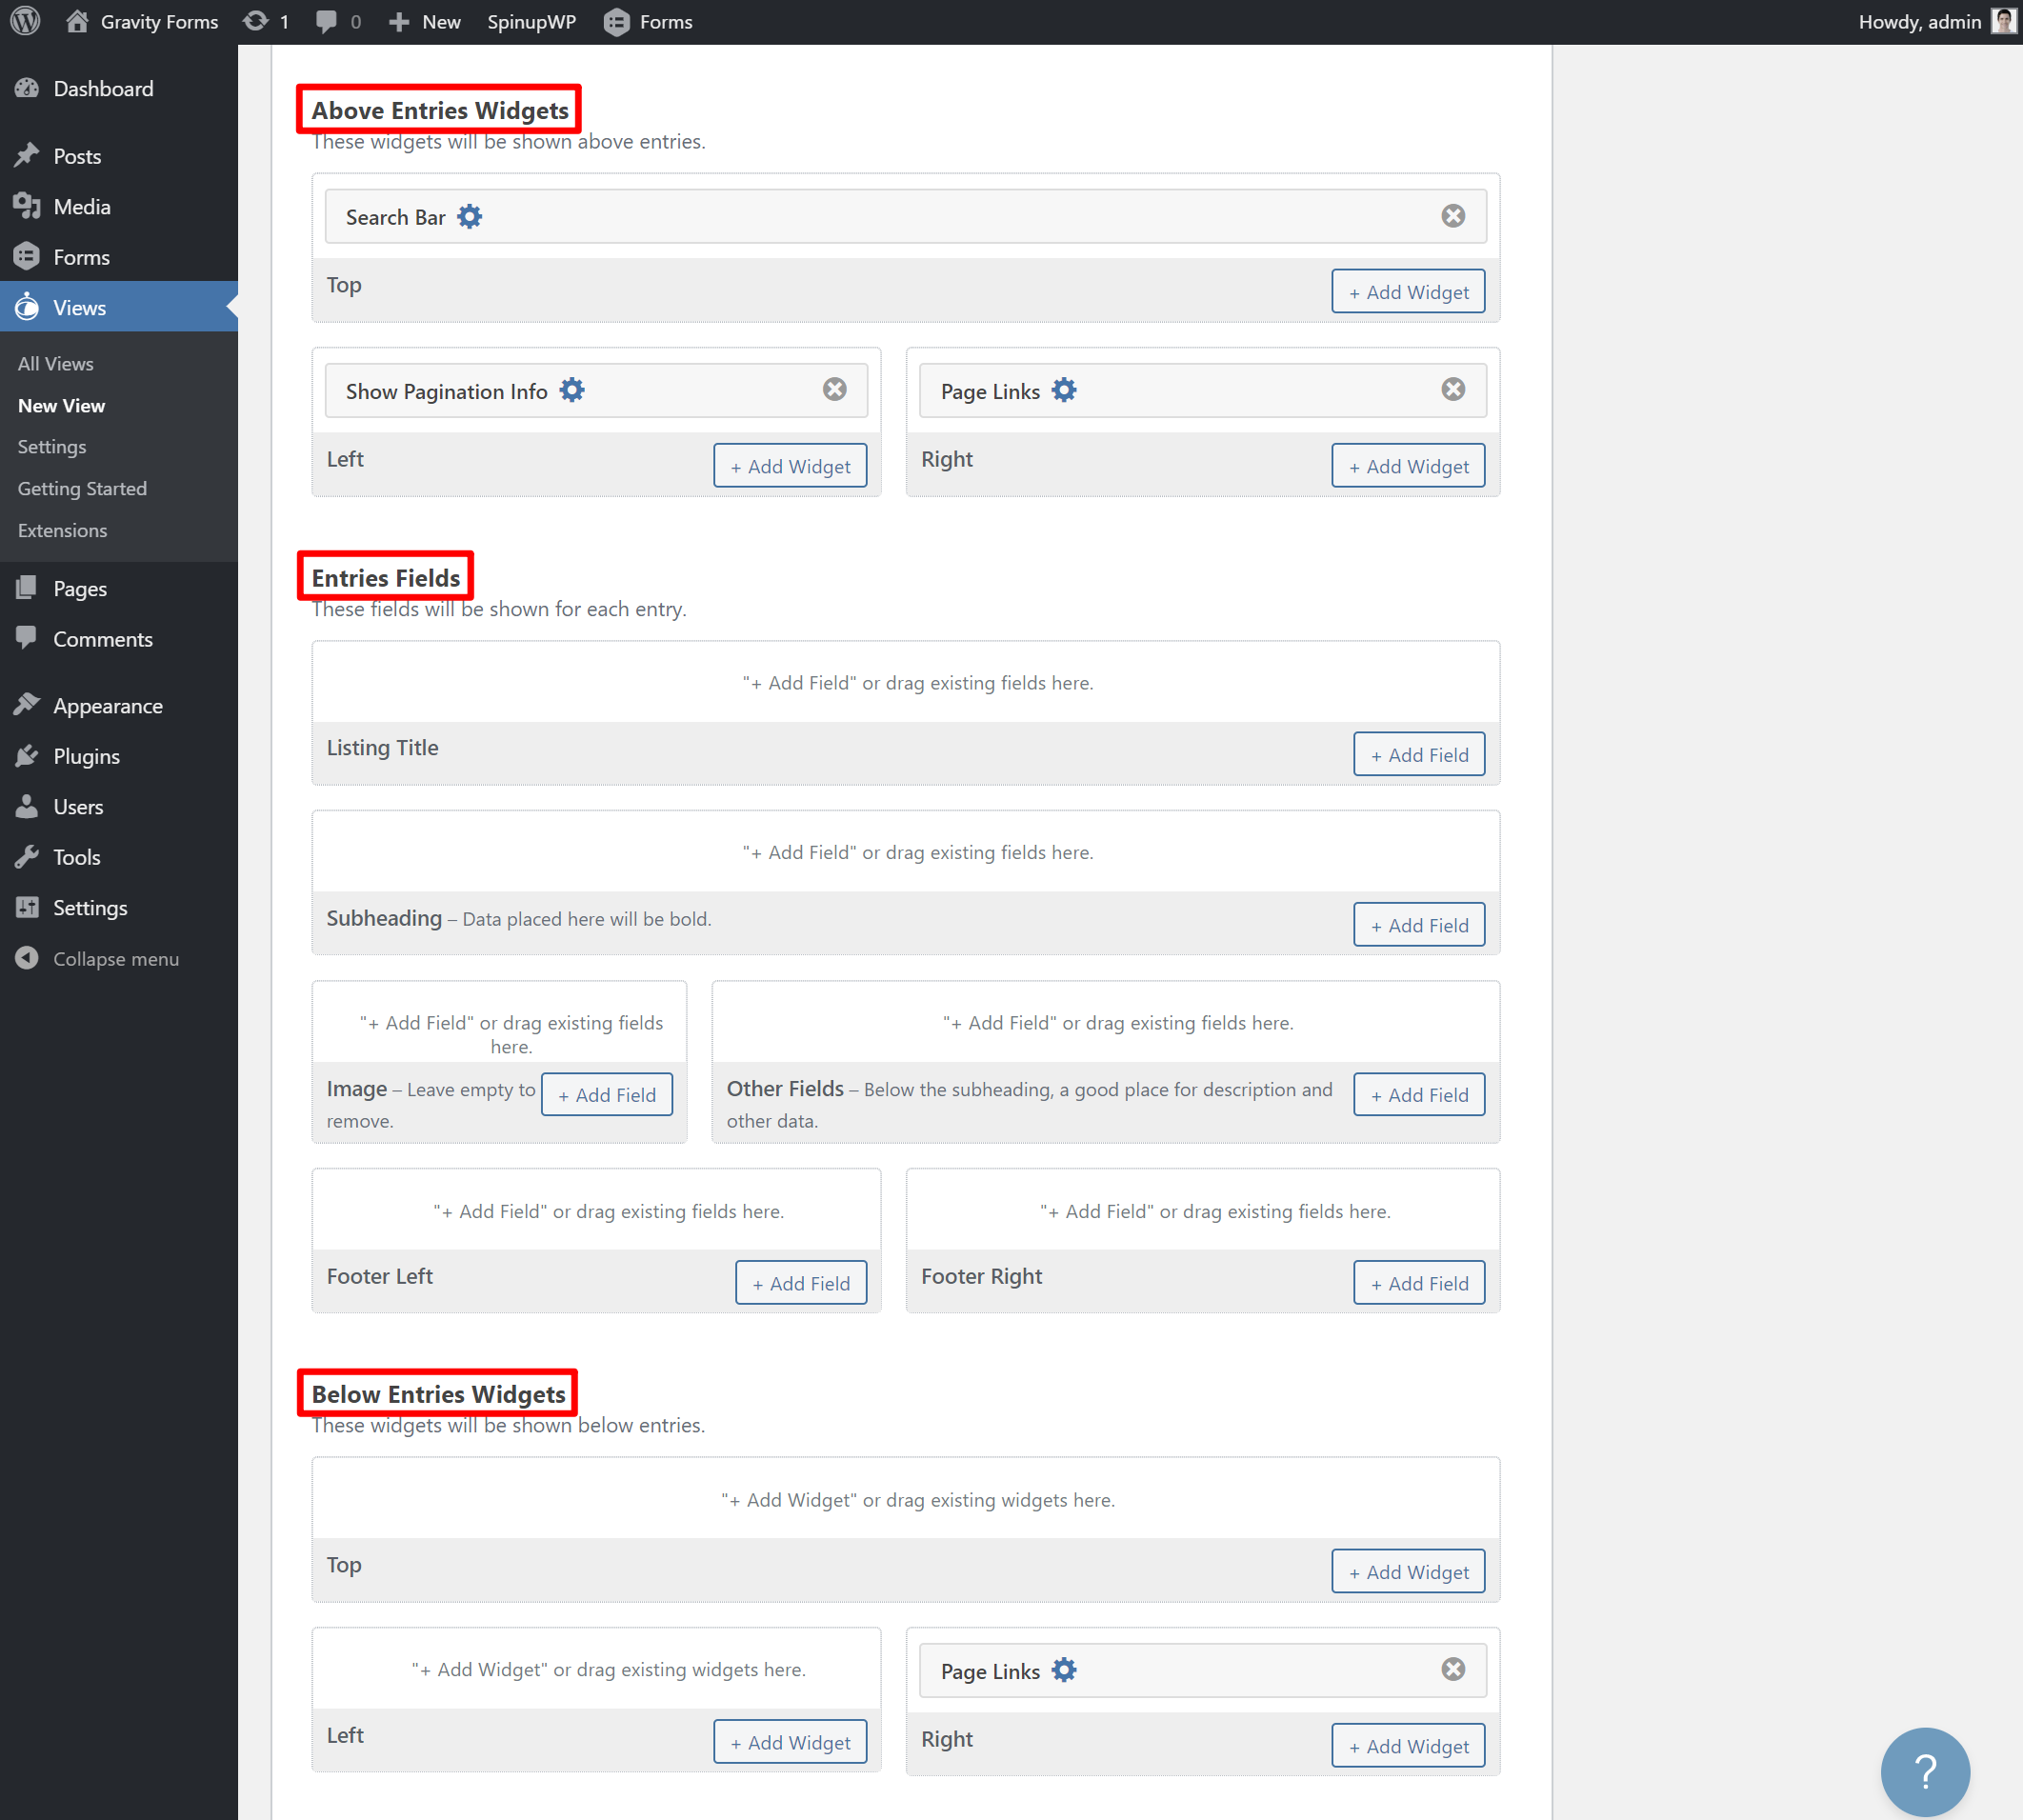
for Multiple inputs You can consult three parts of the page:
- Widgets from previous posts – These widgets appear only once. For example, you can add a search or filter box.
- Input fields – these “loops” for each item displayed. This means that they are repeated over and over to show the same details for each record ().
- Widgets down – Like the widgets from previous posts, these widgets appear only once. You can use them for things like pagination or another search box.
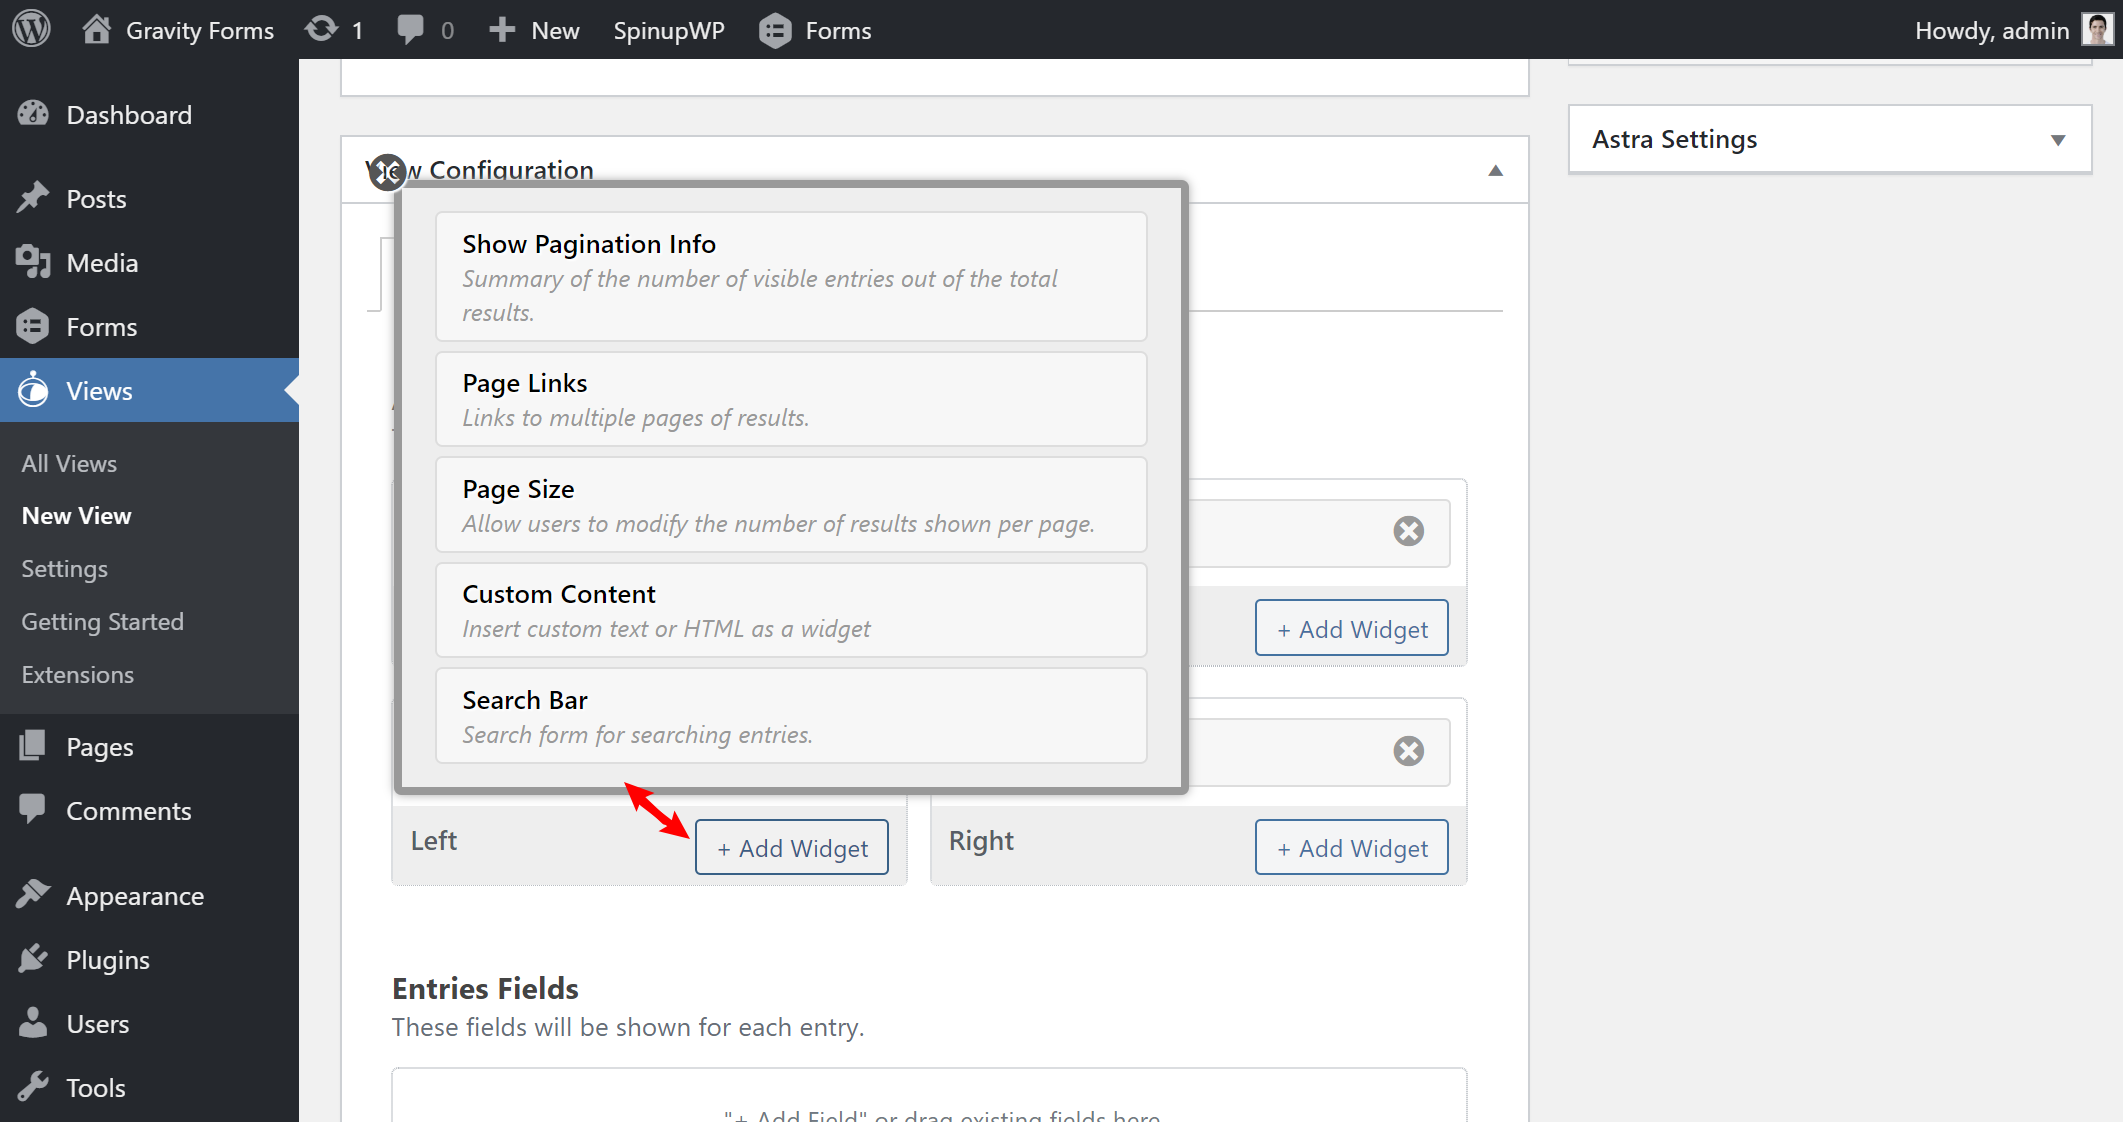
For before and after widgets, you can choose from a standard selection of widgets, including:
- View information on the page.
- Page links.
- Page Size – Allows users to change the number of records displayed.
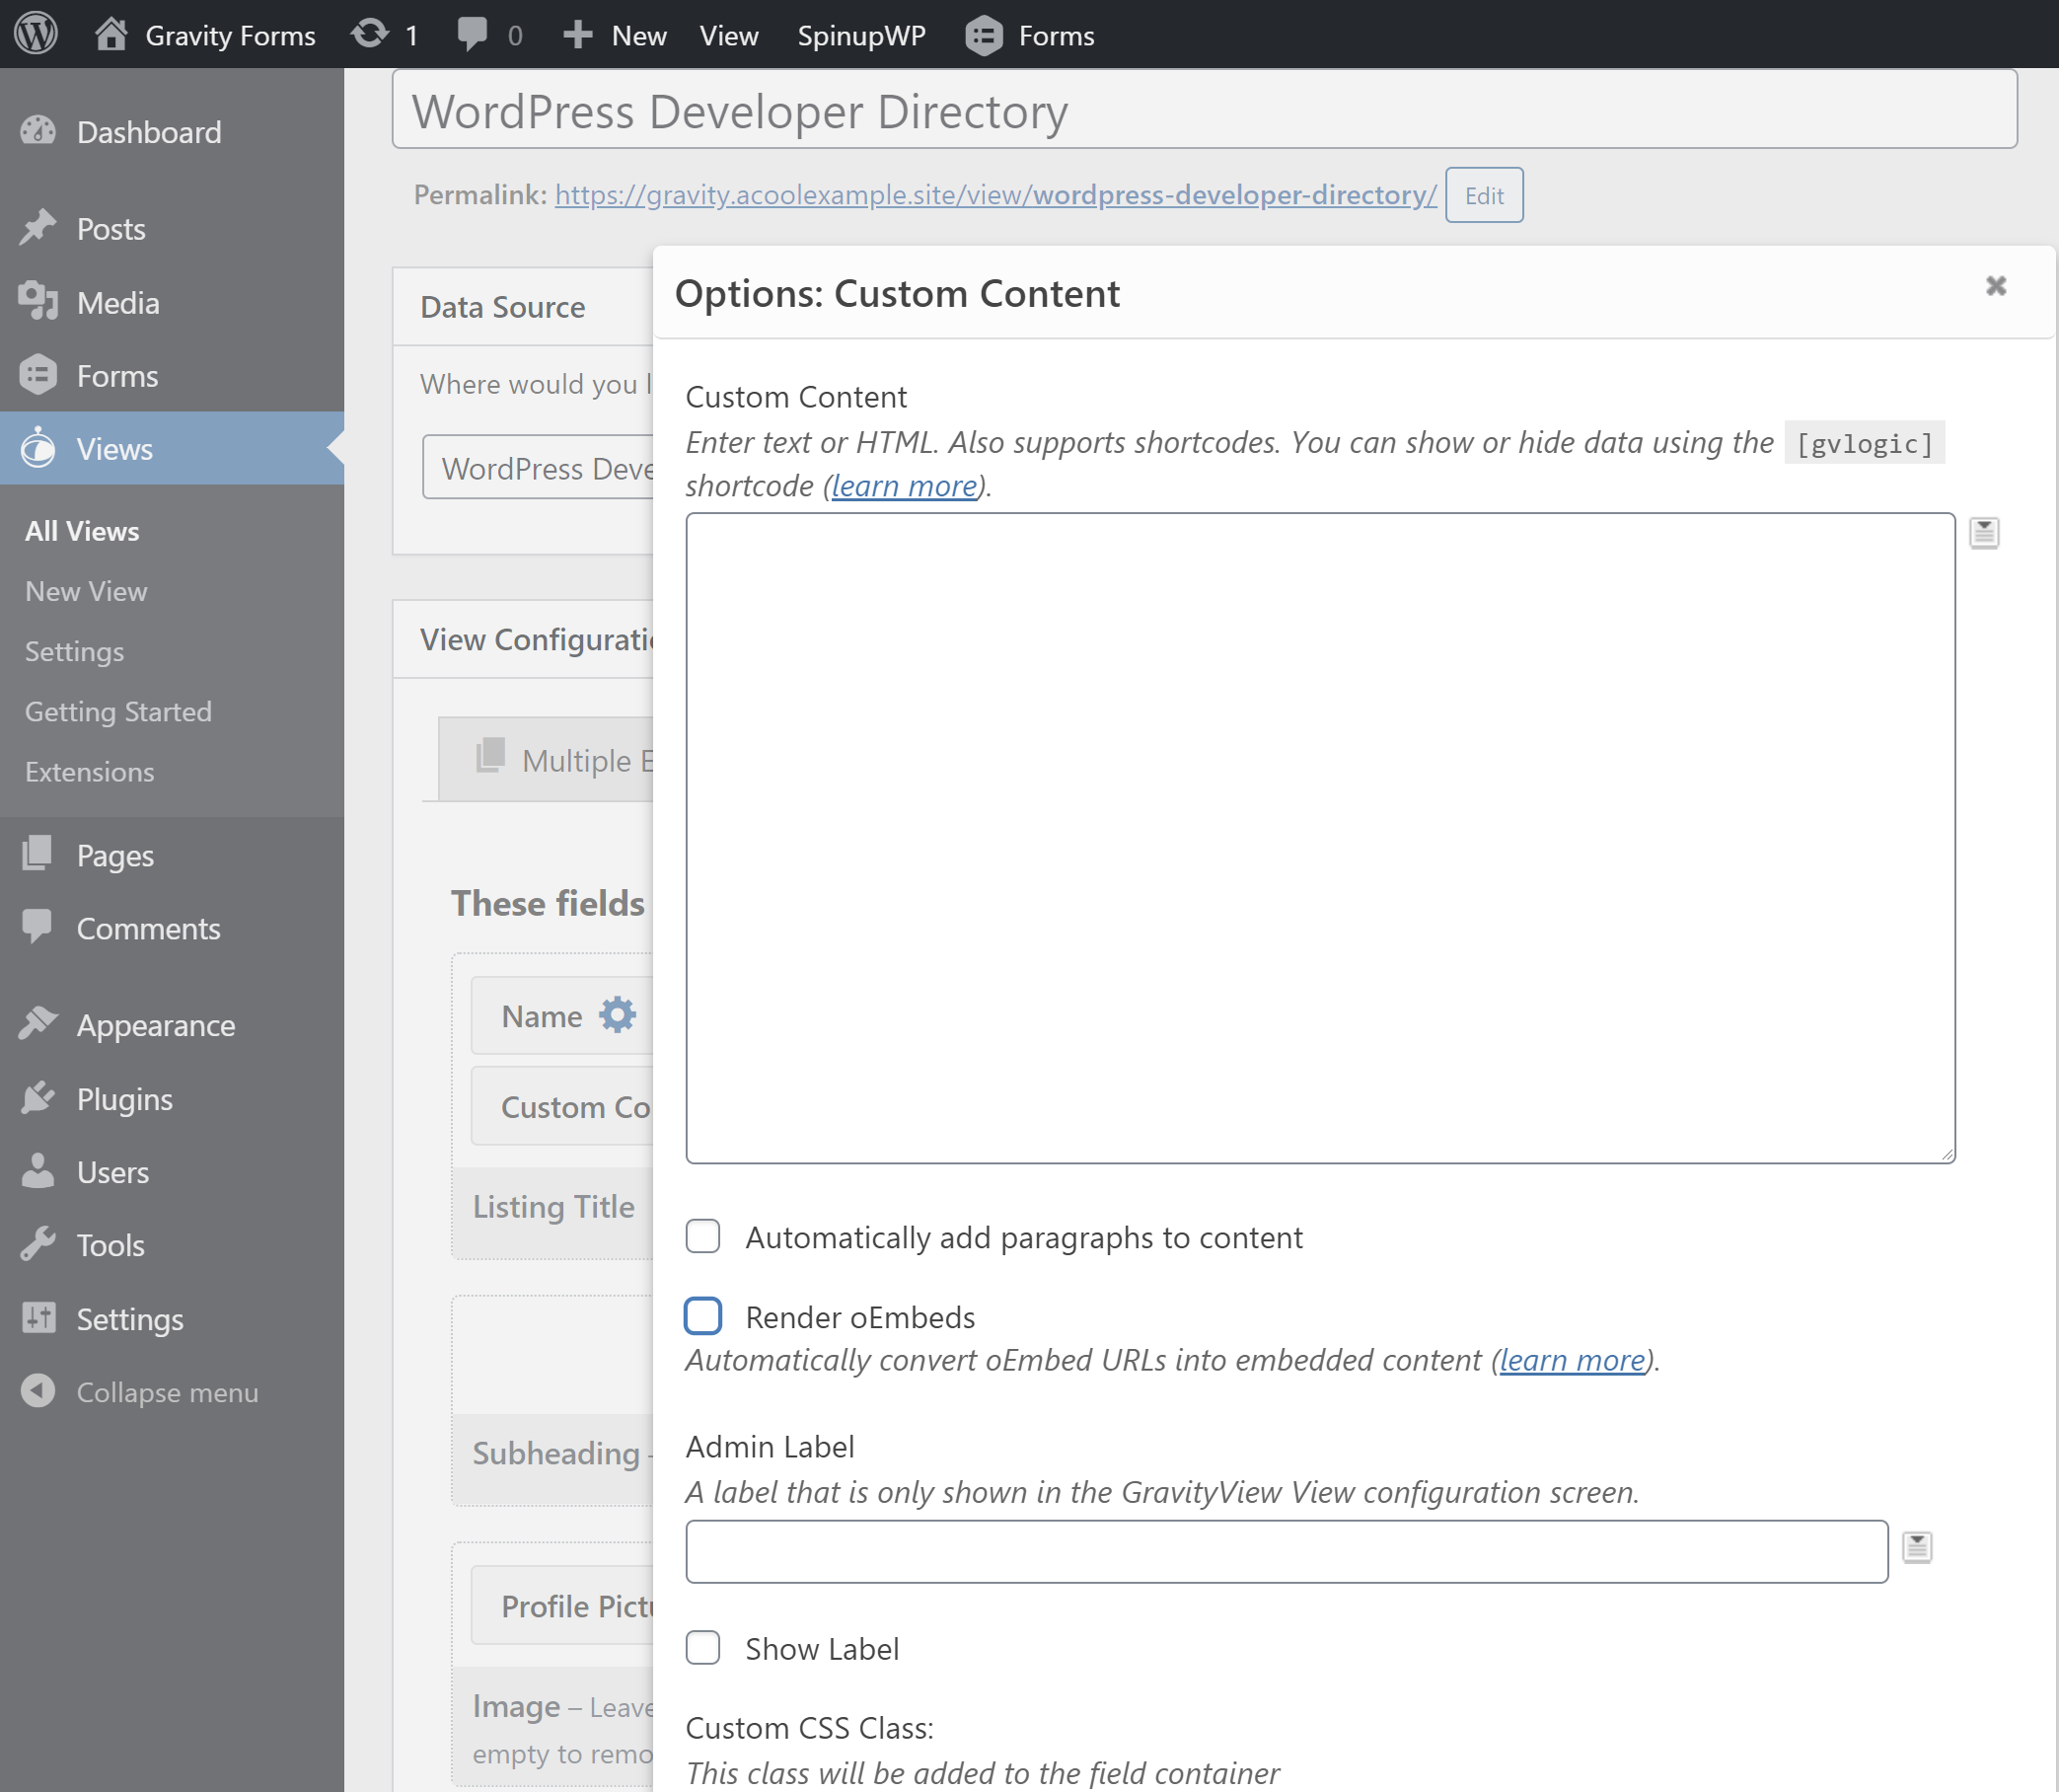
- Custom content: add your own static content.
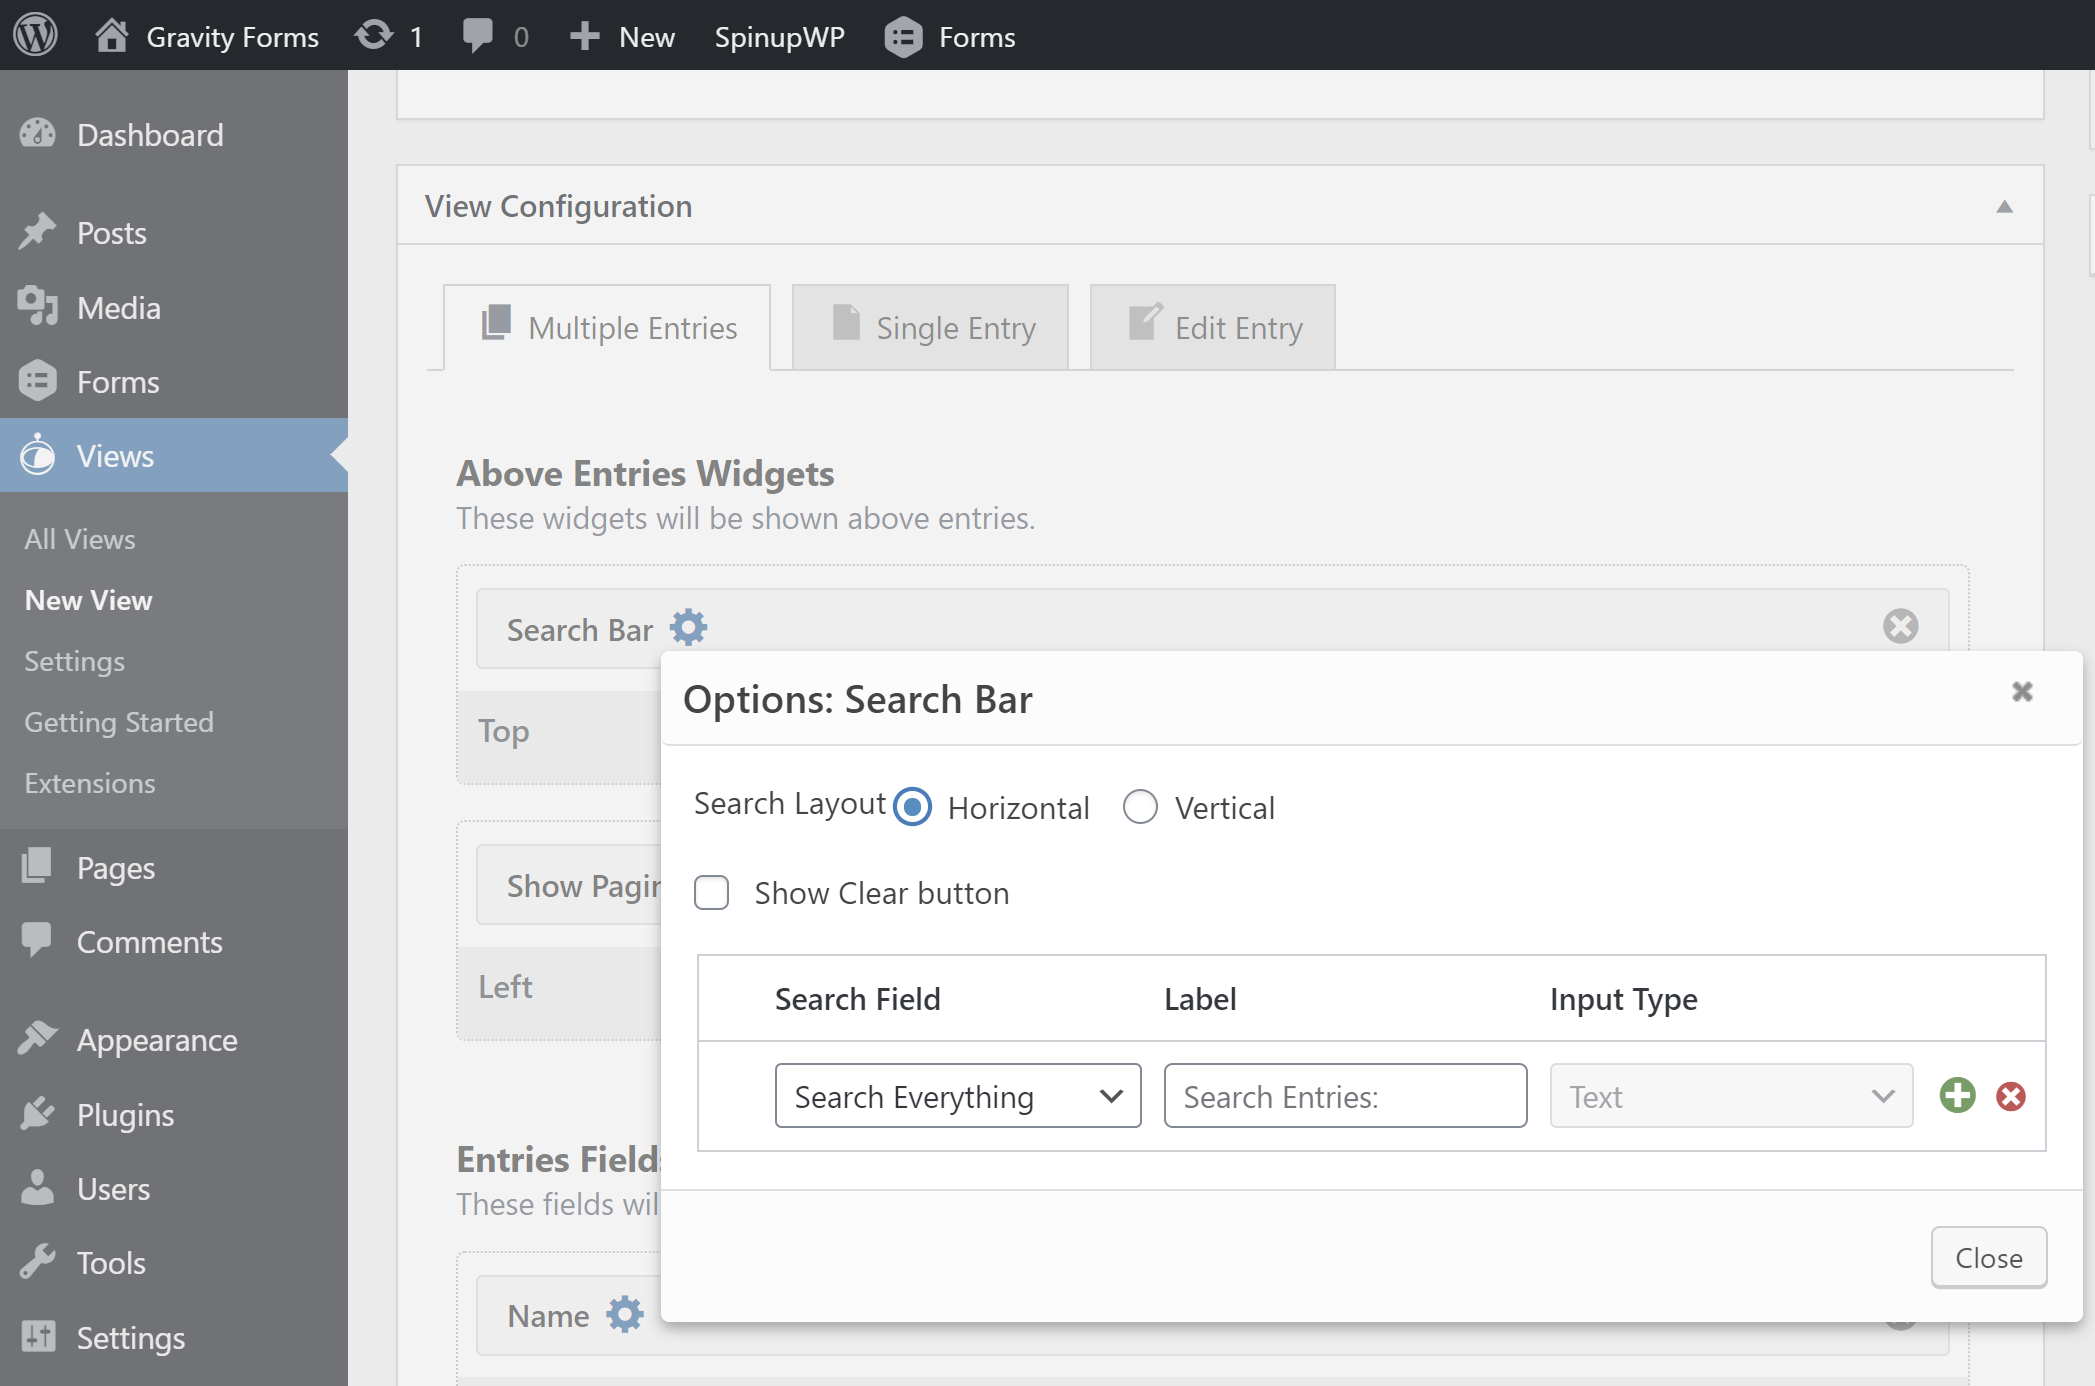
- Search bar.
You can check how this widget works by clicking on the settings icon next to a widget. For example, if your Edit Search Box allows you to restrict it to searching only specific fields in each entry and configure some other settings:
You can also add additional widgets with plugins, which I will discuss later.
For input fields, you can select the actual form fields from the previously selected form.
For example, you can configure the title of each list to match the name of your form:
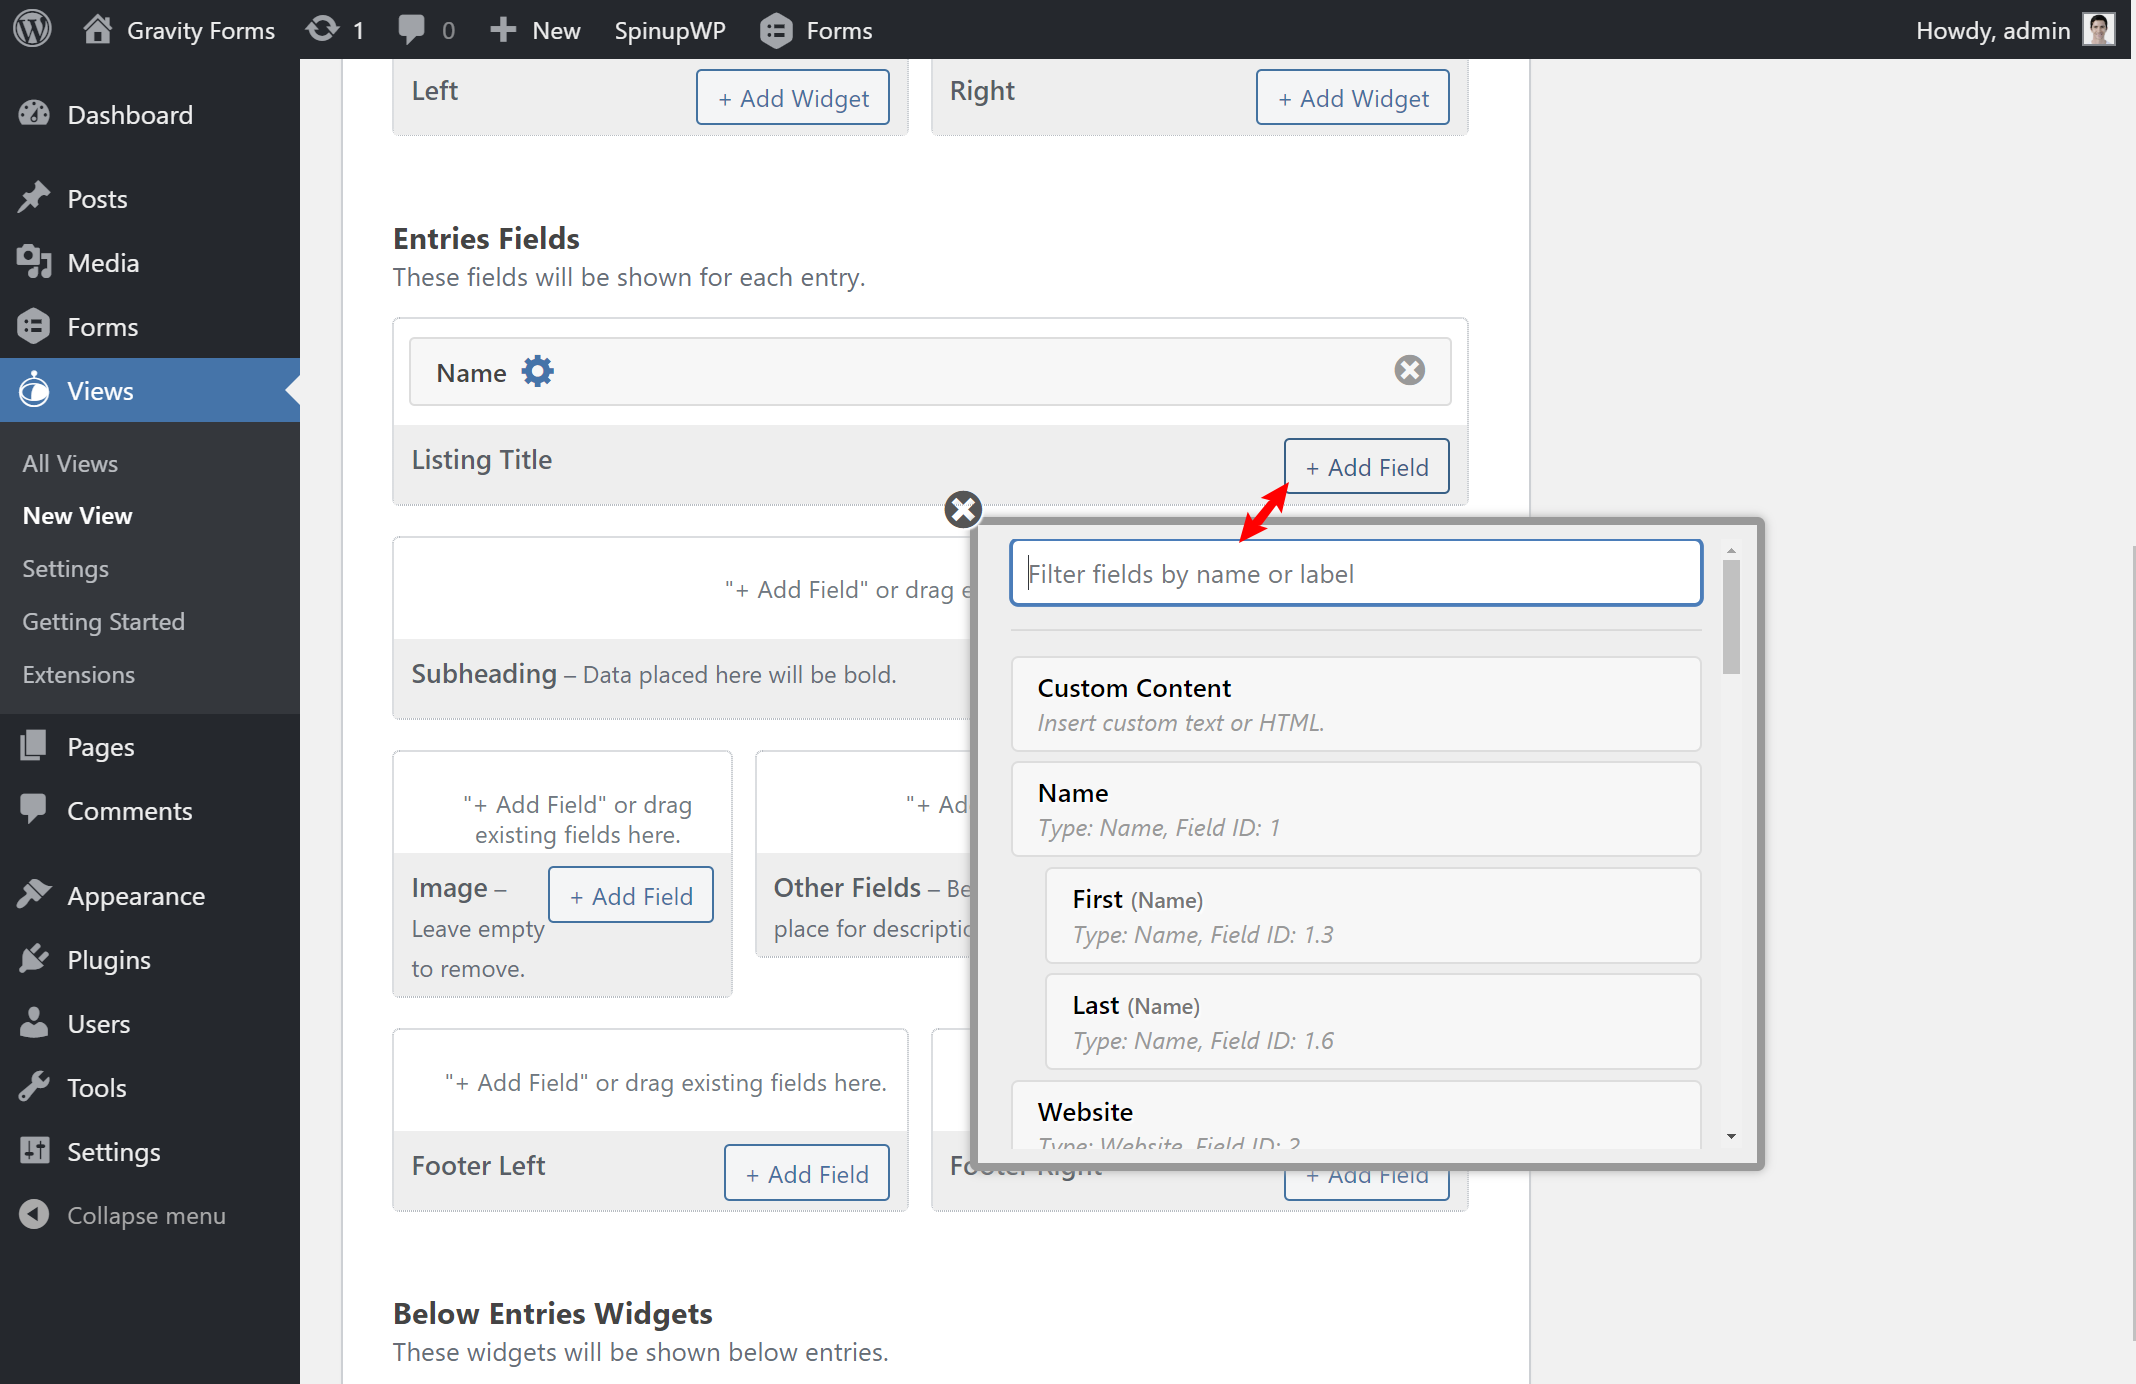
You can add fields to all the different design areas for the selected design and drag and drop the fields as necessary.
One thing to note is that it is limited to the preconfigured layout ()
If you know HTML and CSS, GravityView offers a tool that allows you to easily create your own designs without having to edit template files. However, if you are familiar with HTML and CSS, you are limited to the default layouts, although you can arrange your fields in these layouts in any order.
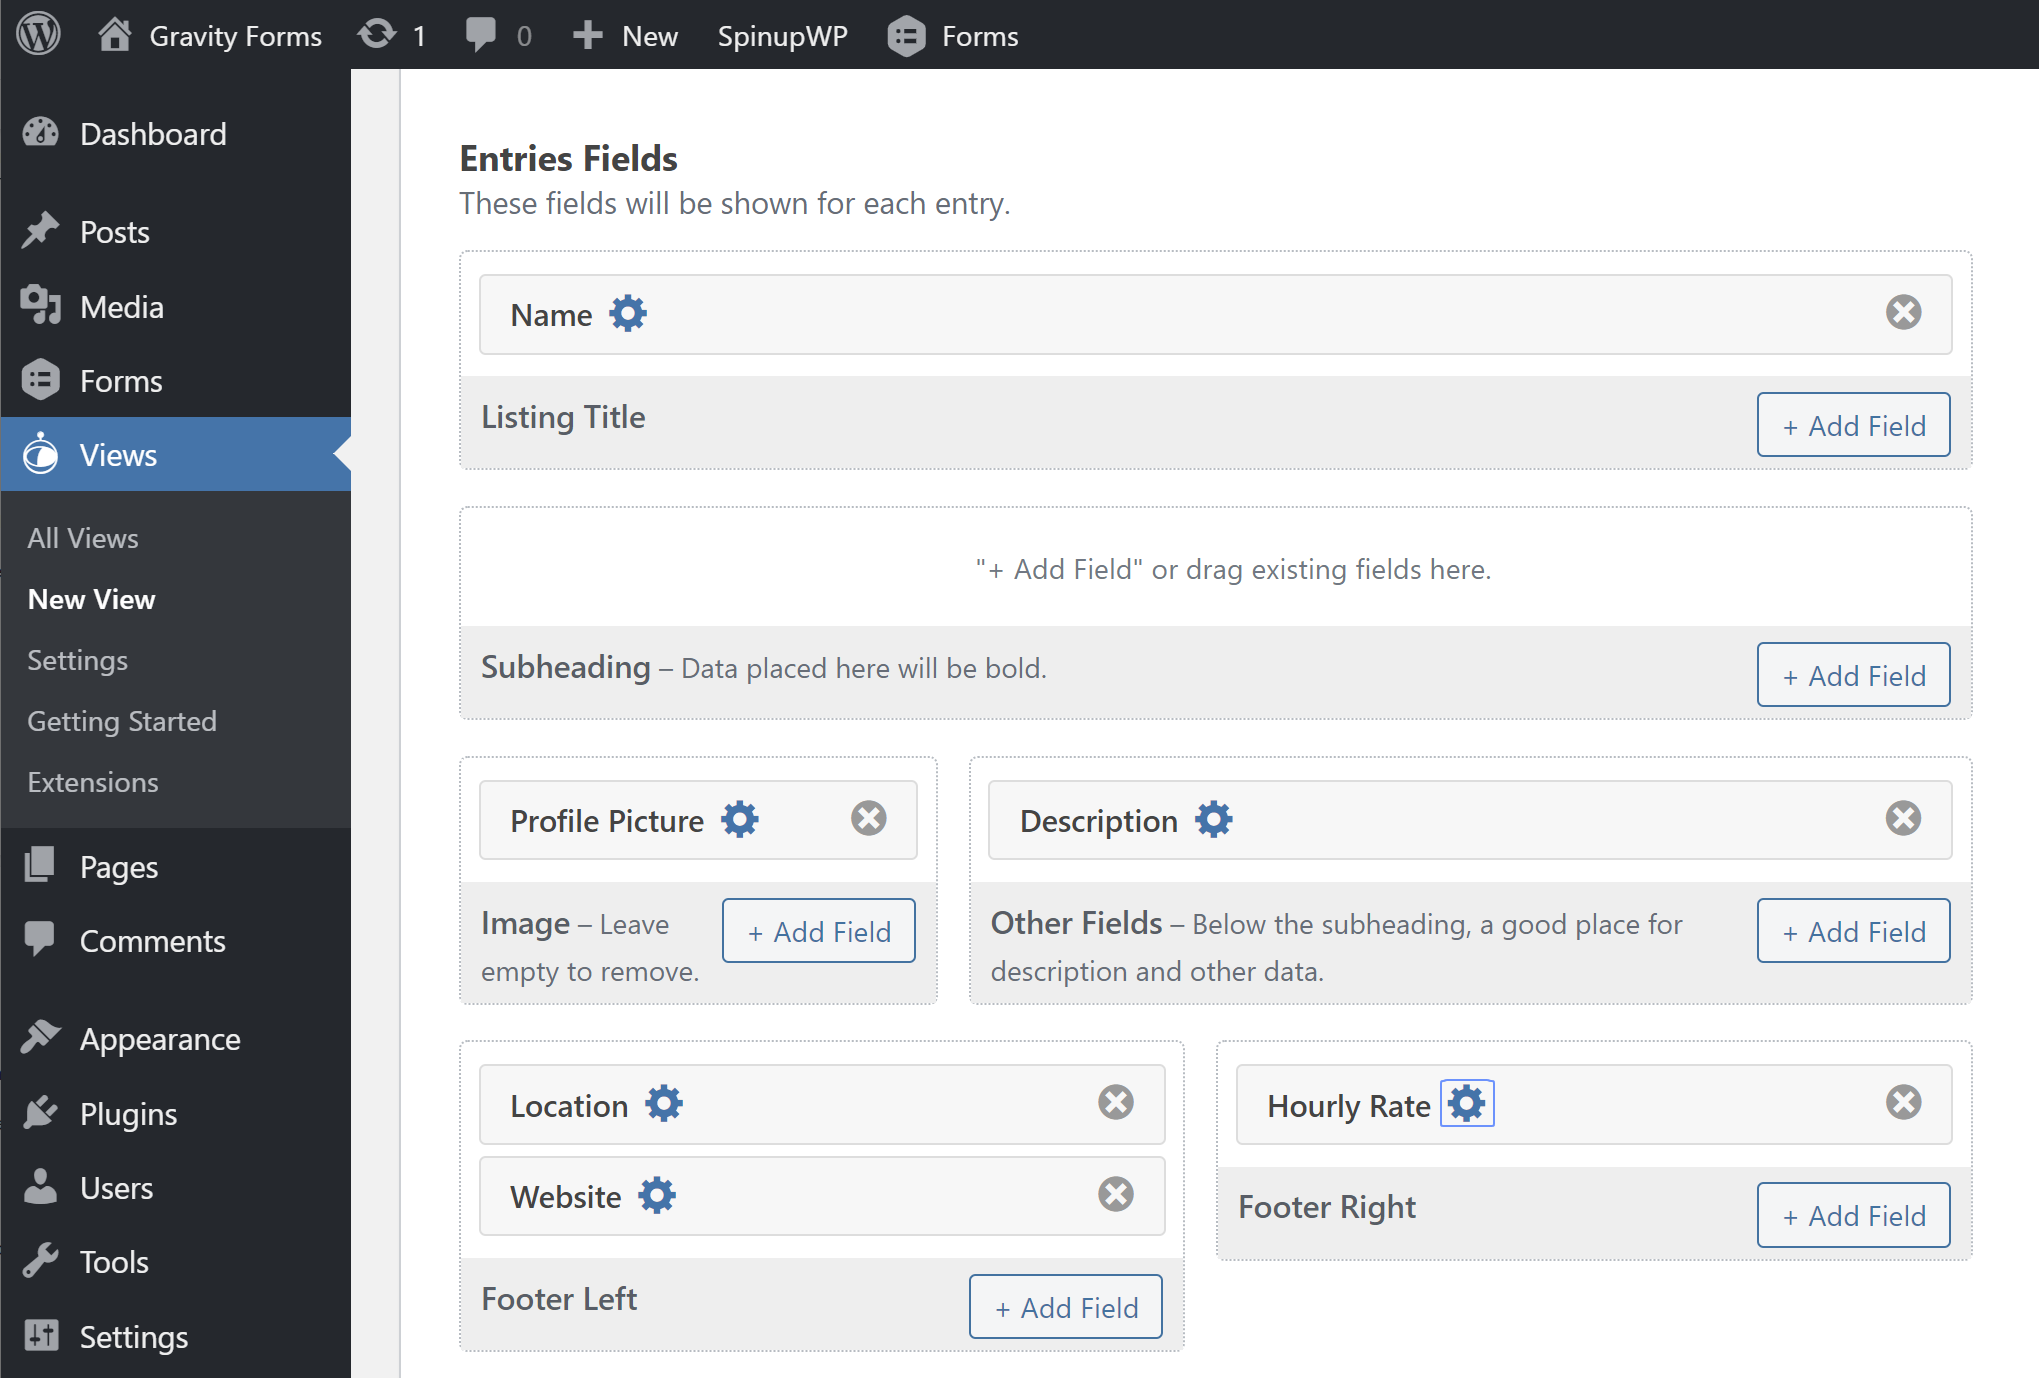
This is what it looked like after adding all the fields from my example form:
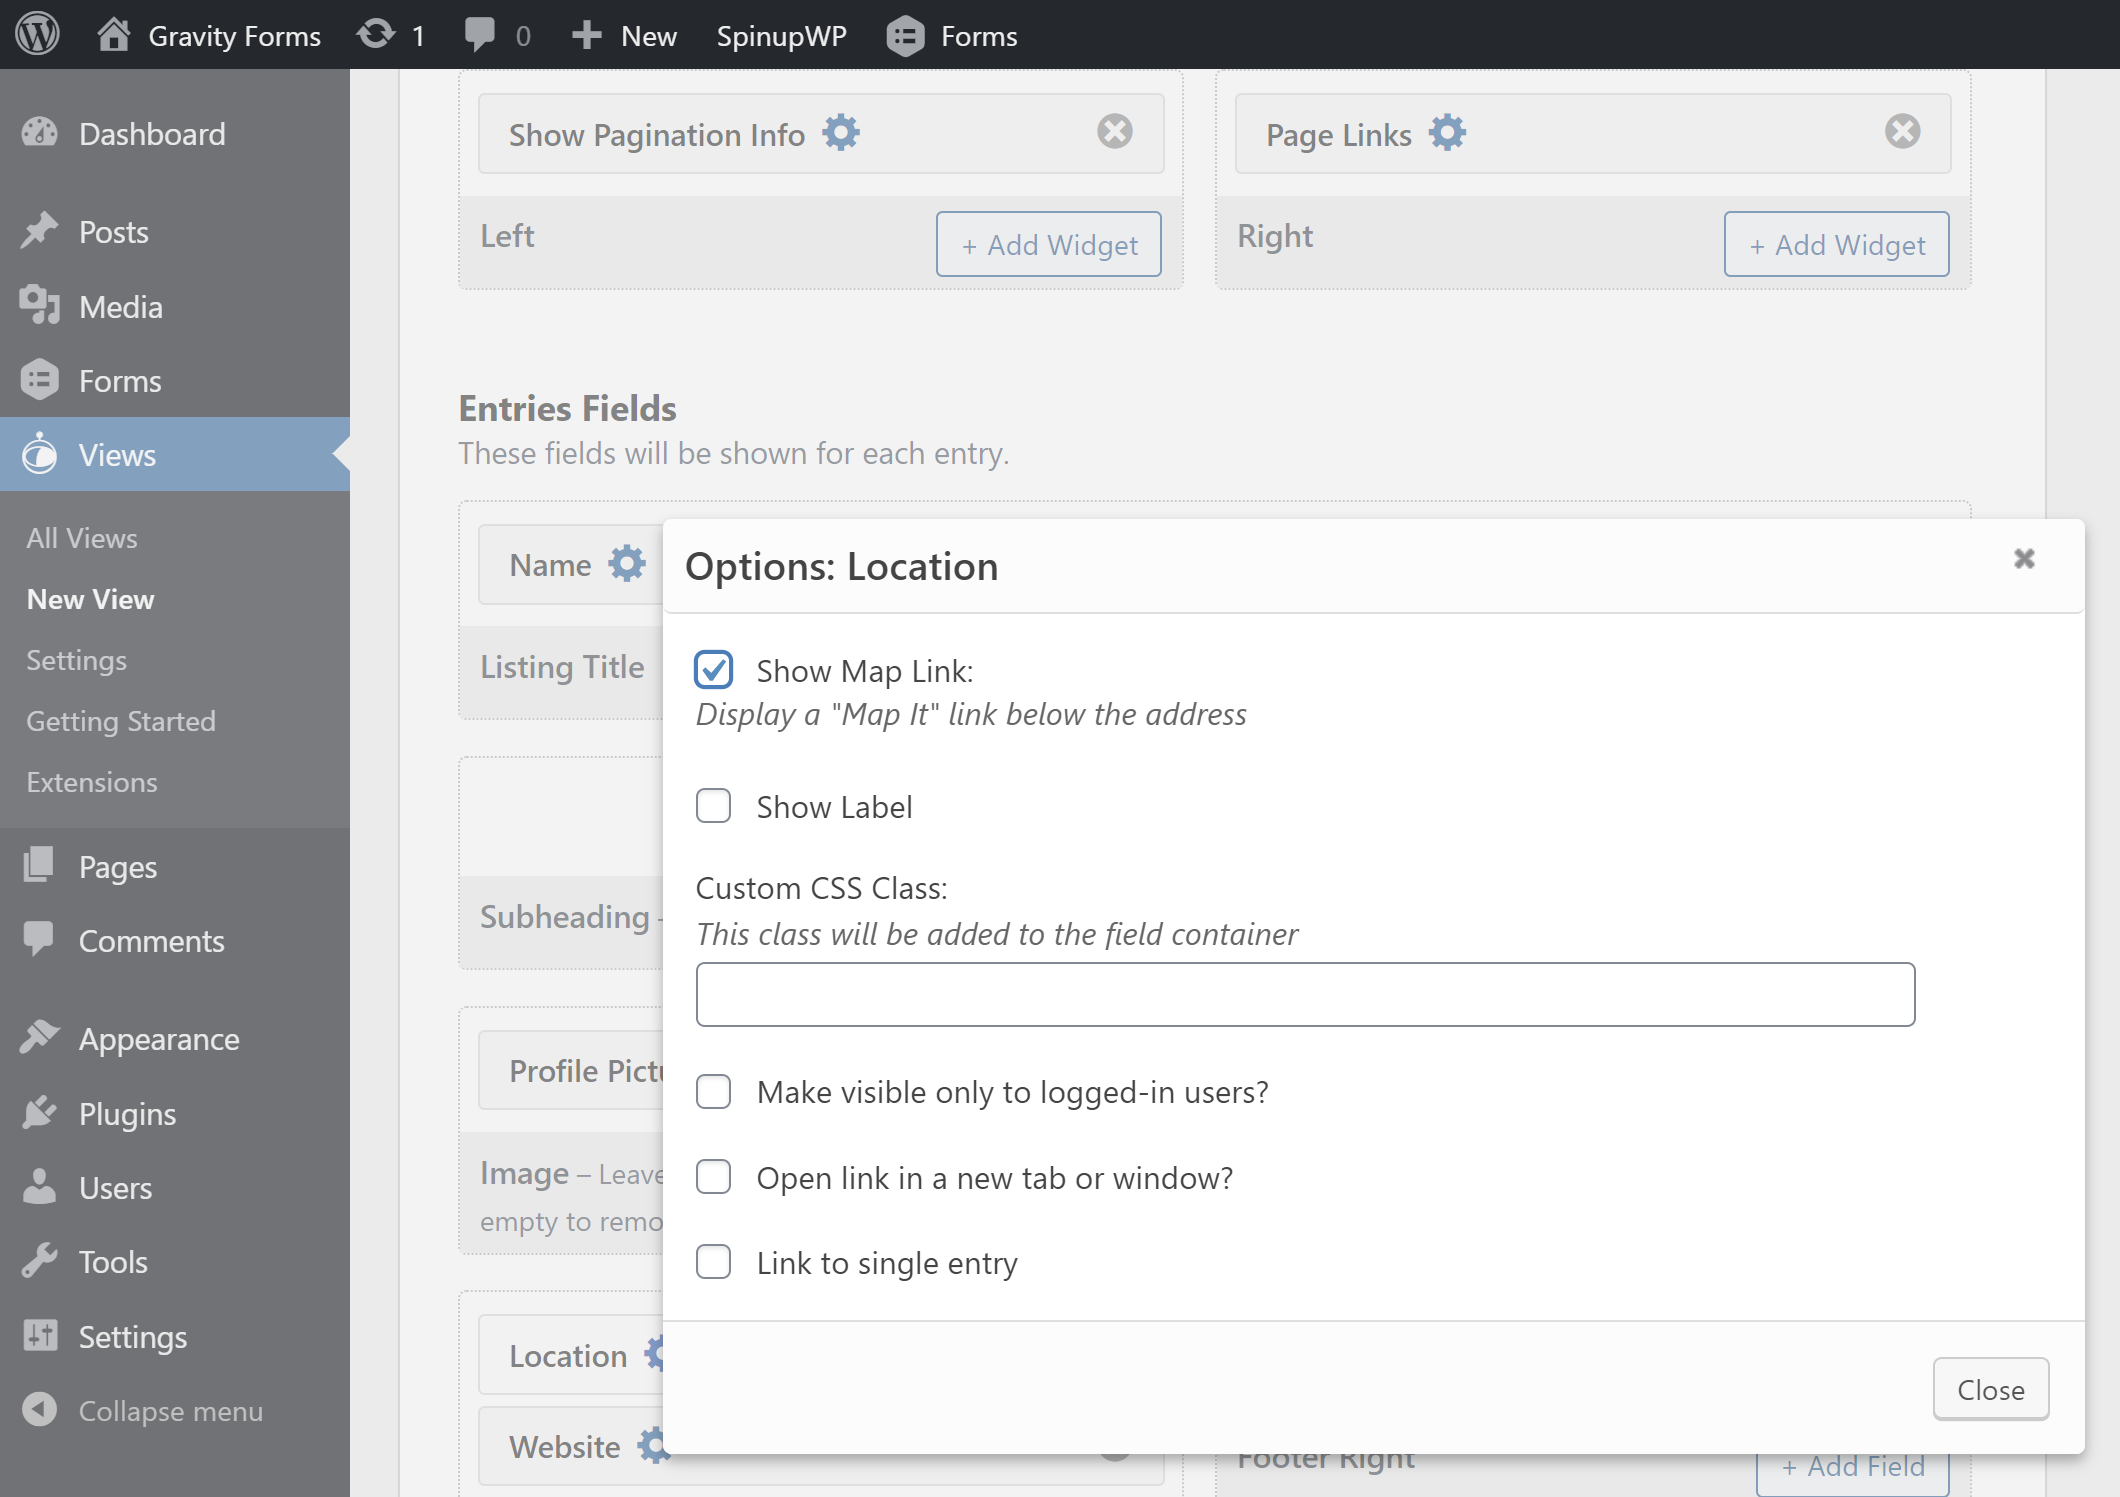
If you click the settings icon next to a form field, you can edit that field. For example, you can only show registered users some fields or link a field to each entry page.
Some fields also get additional settings. For example, for a location field, you can. Add a “Map It” link so users can find the location using Google Maps:
Template with entry
you Single entry In the tab, you can use an identical interface to design the layout of each entry page. Only now it only works with the form fields; Search widgets or widgets are not required as this template only shows a specific entry:
You can also add your own personalized content with one Custom content Fields if necessary and fields where people can edit or delete records:
As with the multi-entry template, you are limited to this default layout definition unless you are familiar with HTML and CSS.
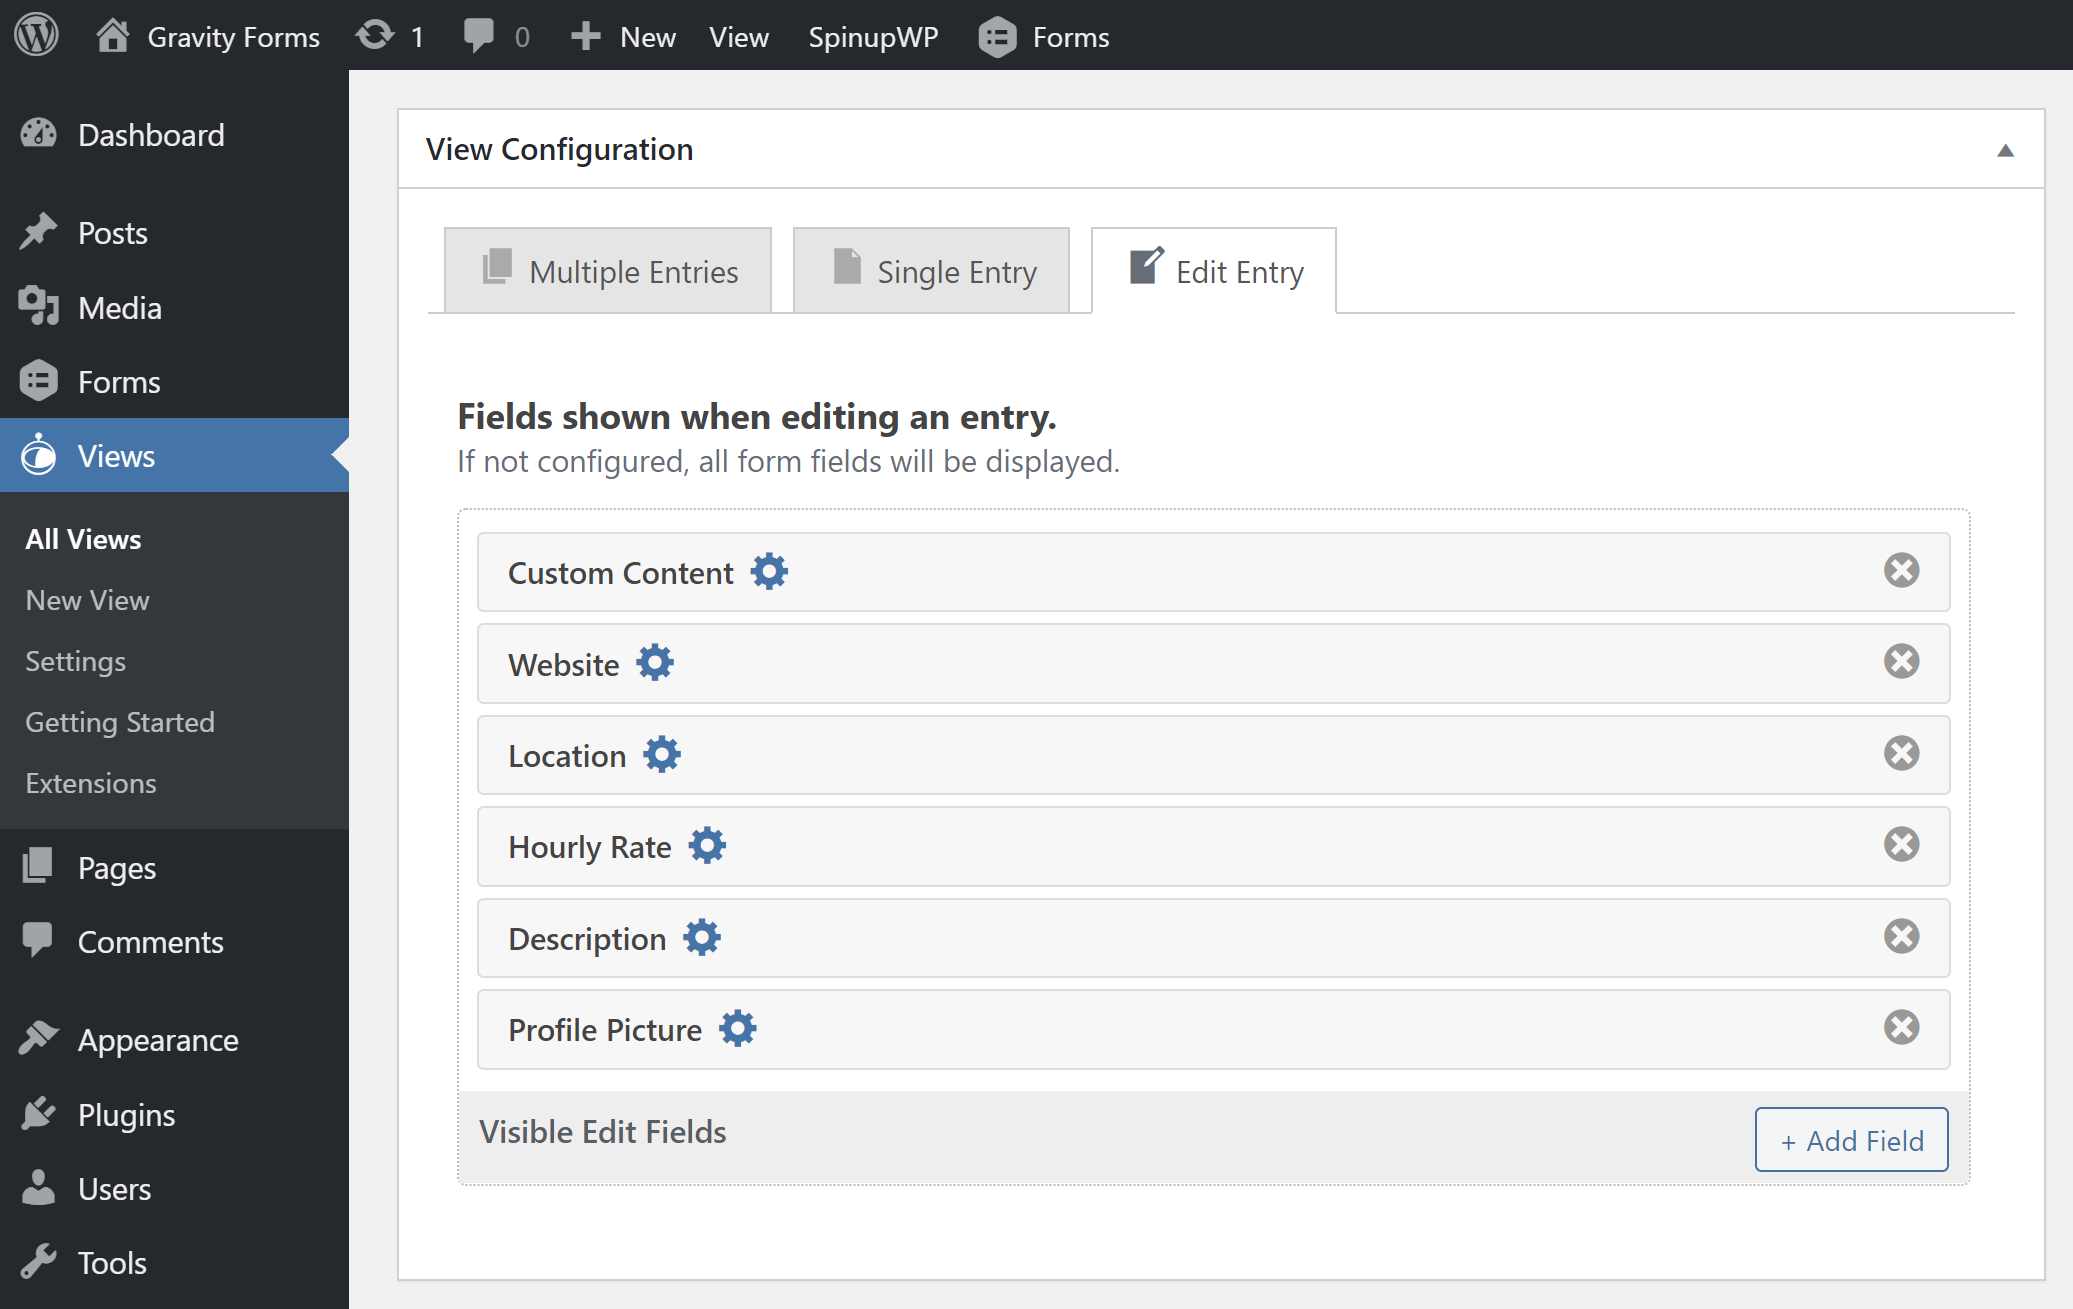
Edit the input template
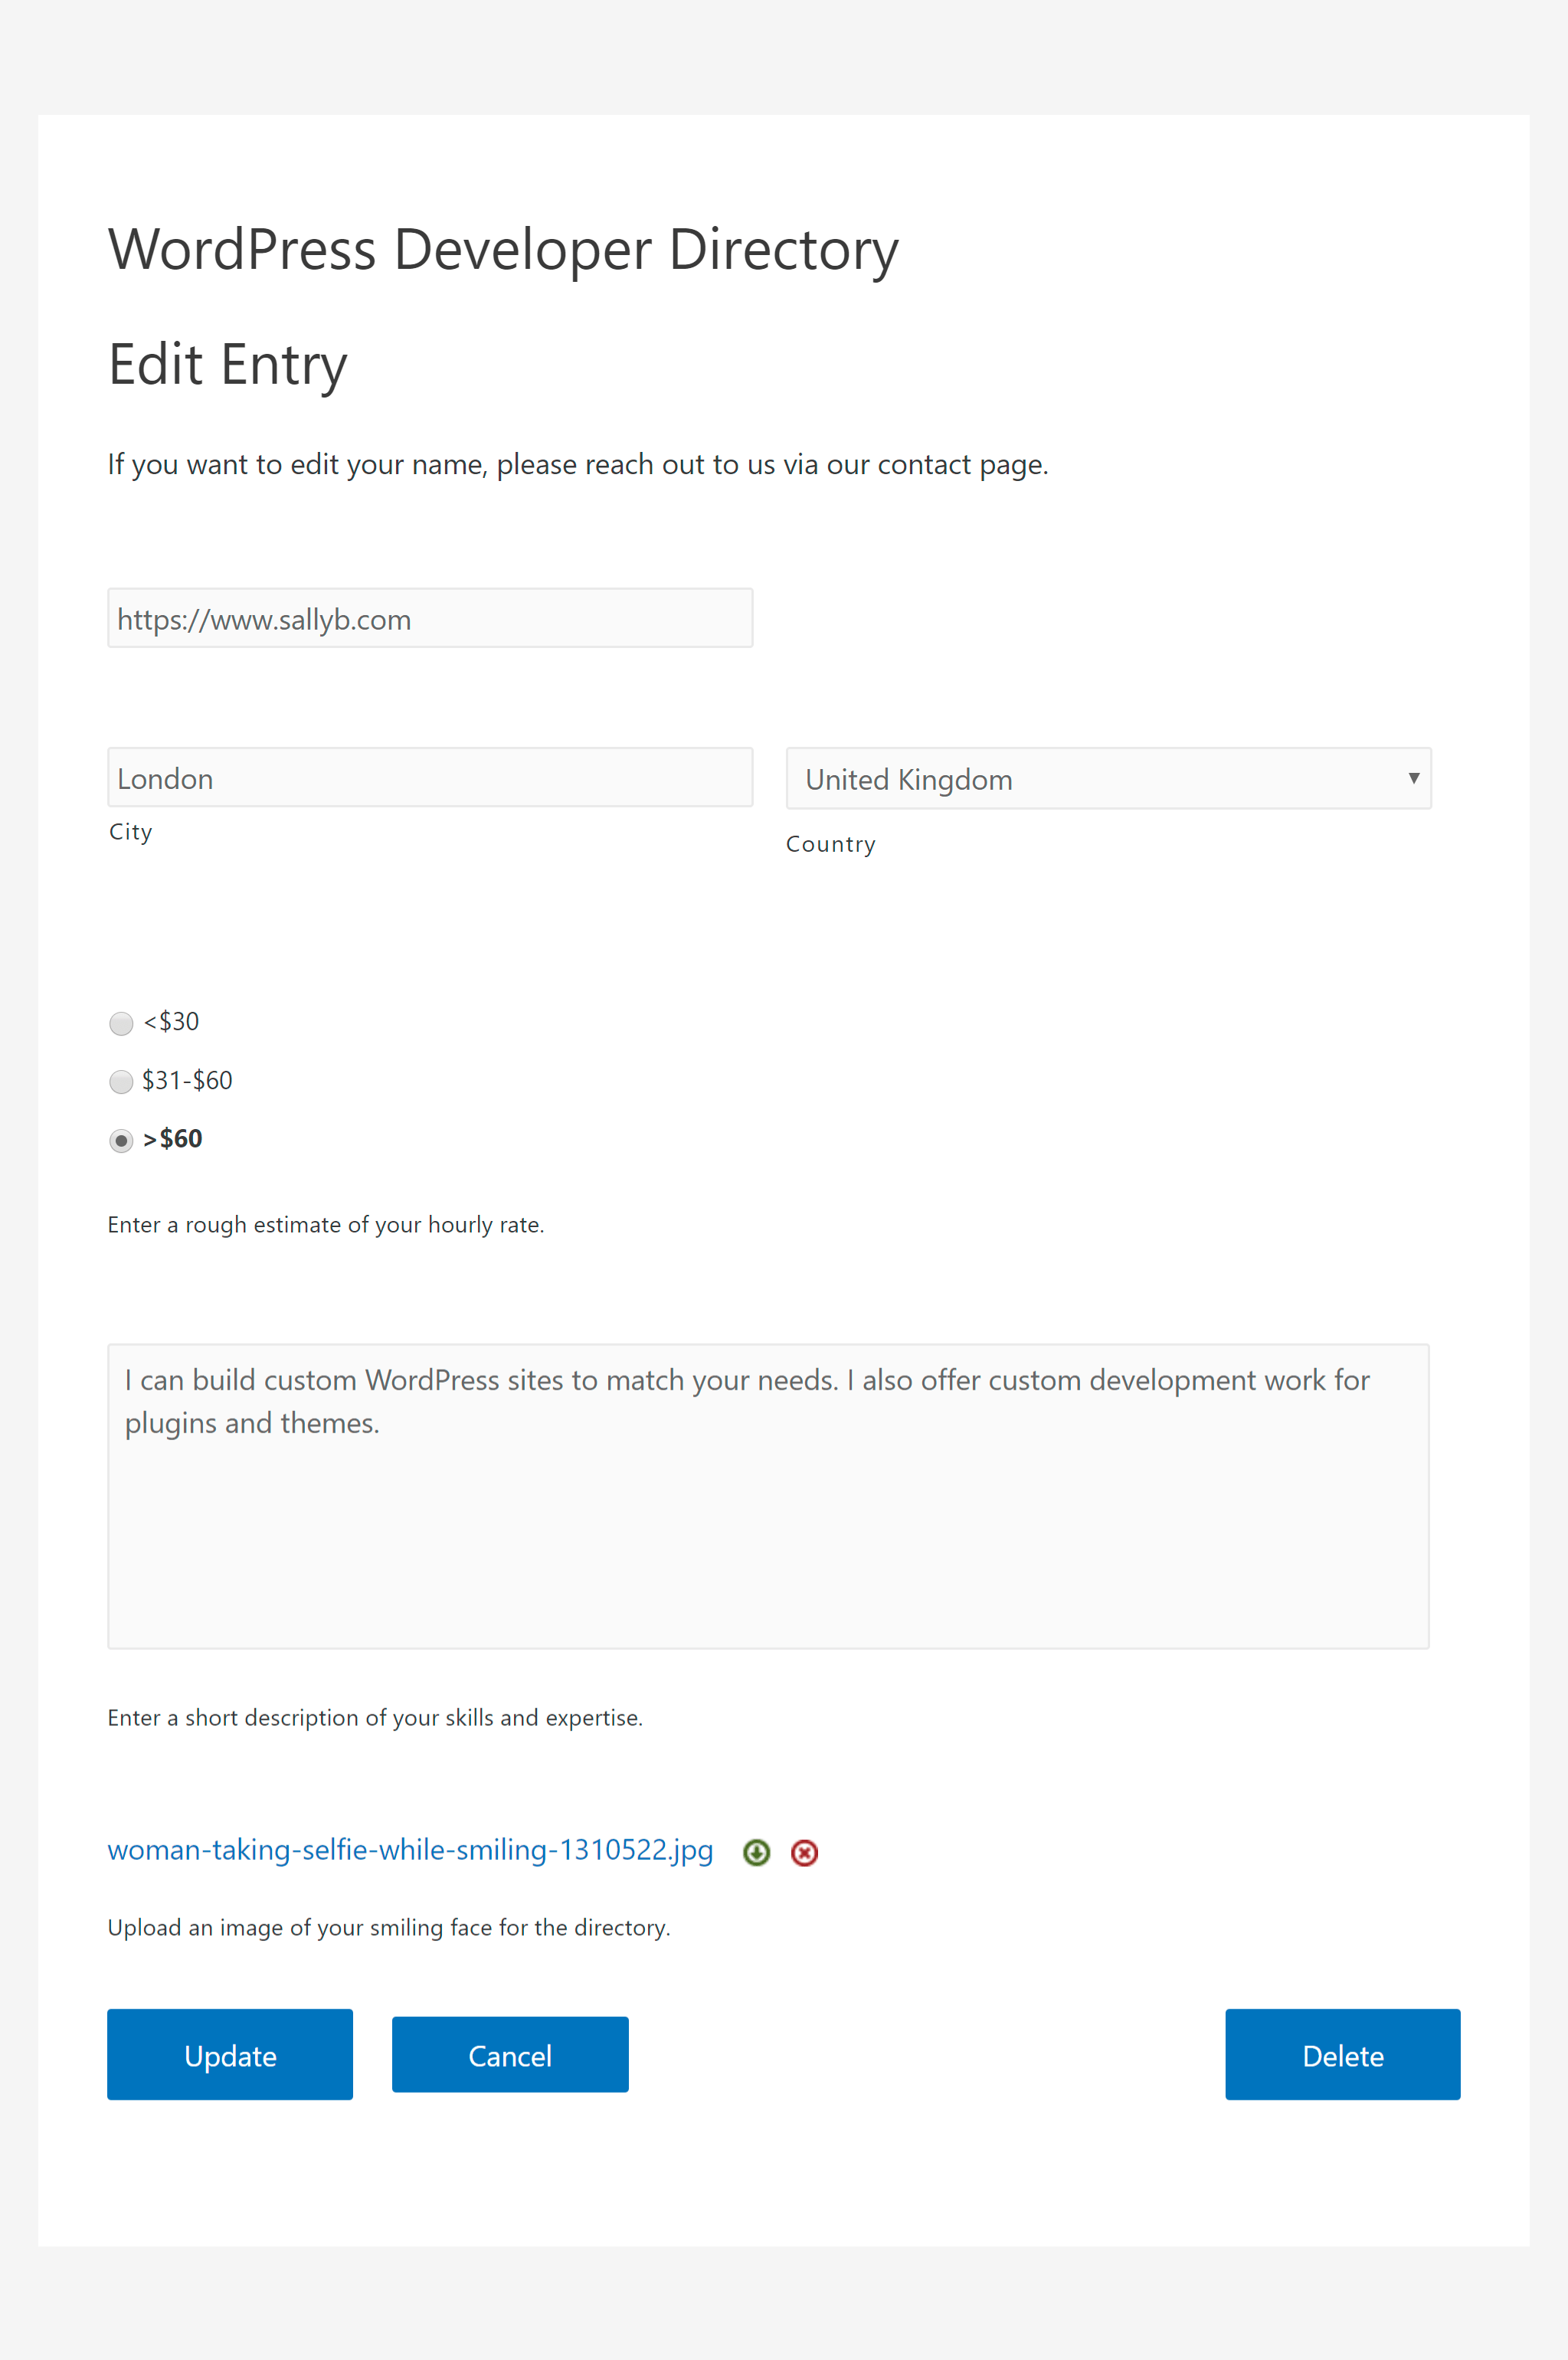
Finally, you can check the design of it Edit mail Model. Again, these are the fields that registered users see when they try to edit one of their own posts.
You can use this so that users can only edit specific fields instead of the entire record.
For example, I can configure it so that WordPress developers can edit all the fields to their name:
See settings
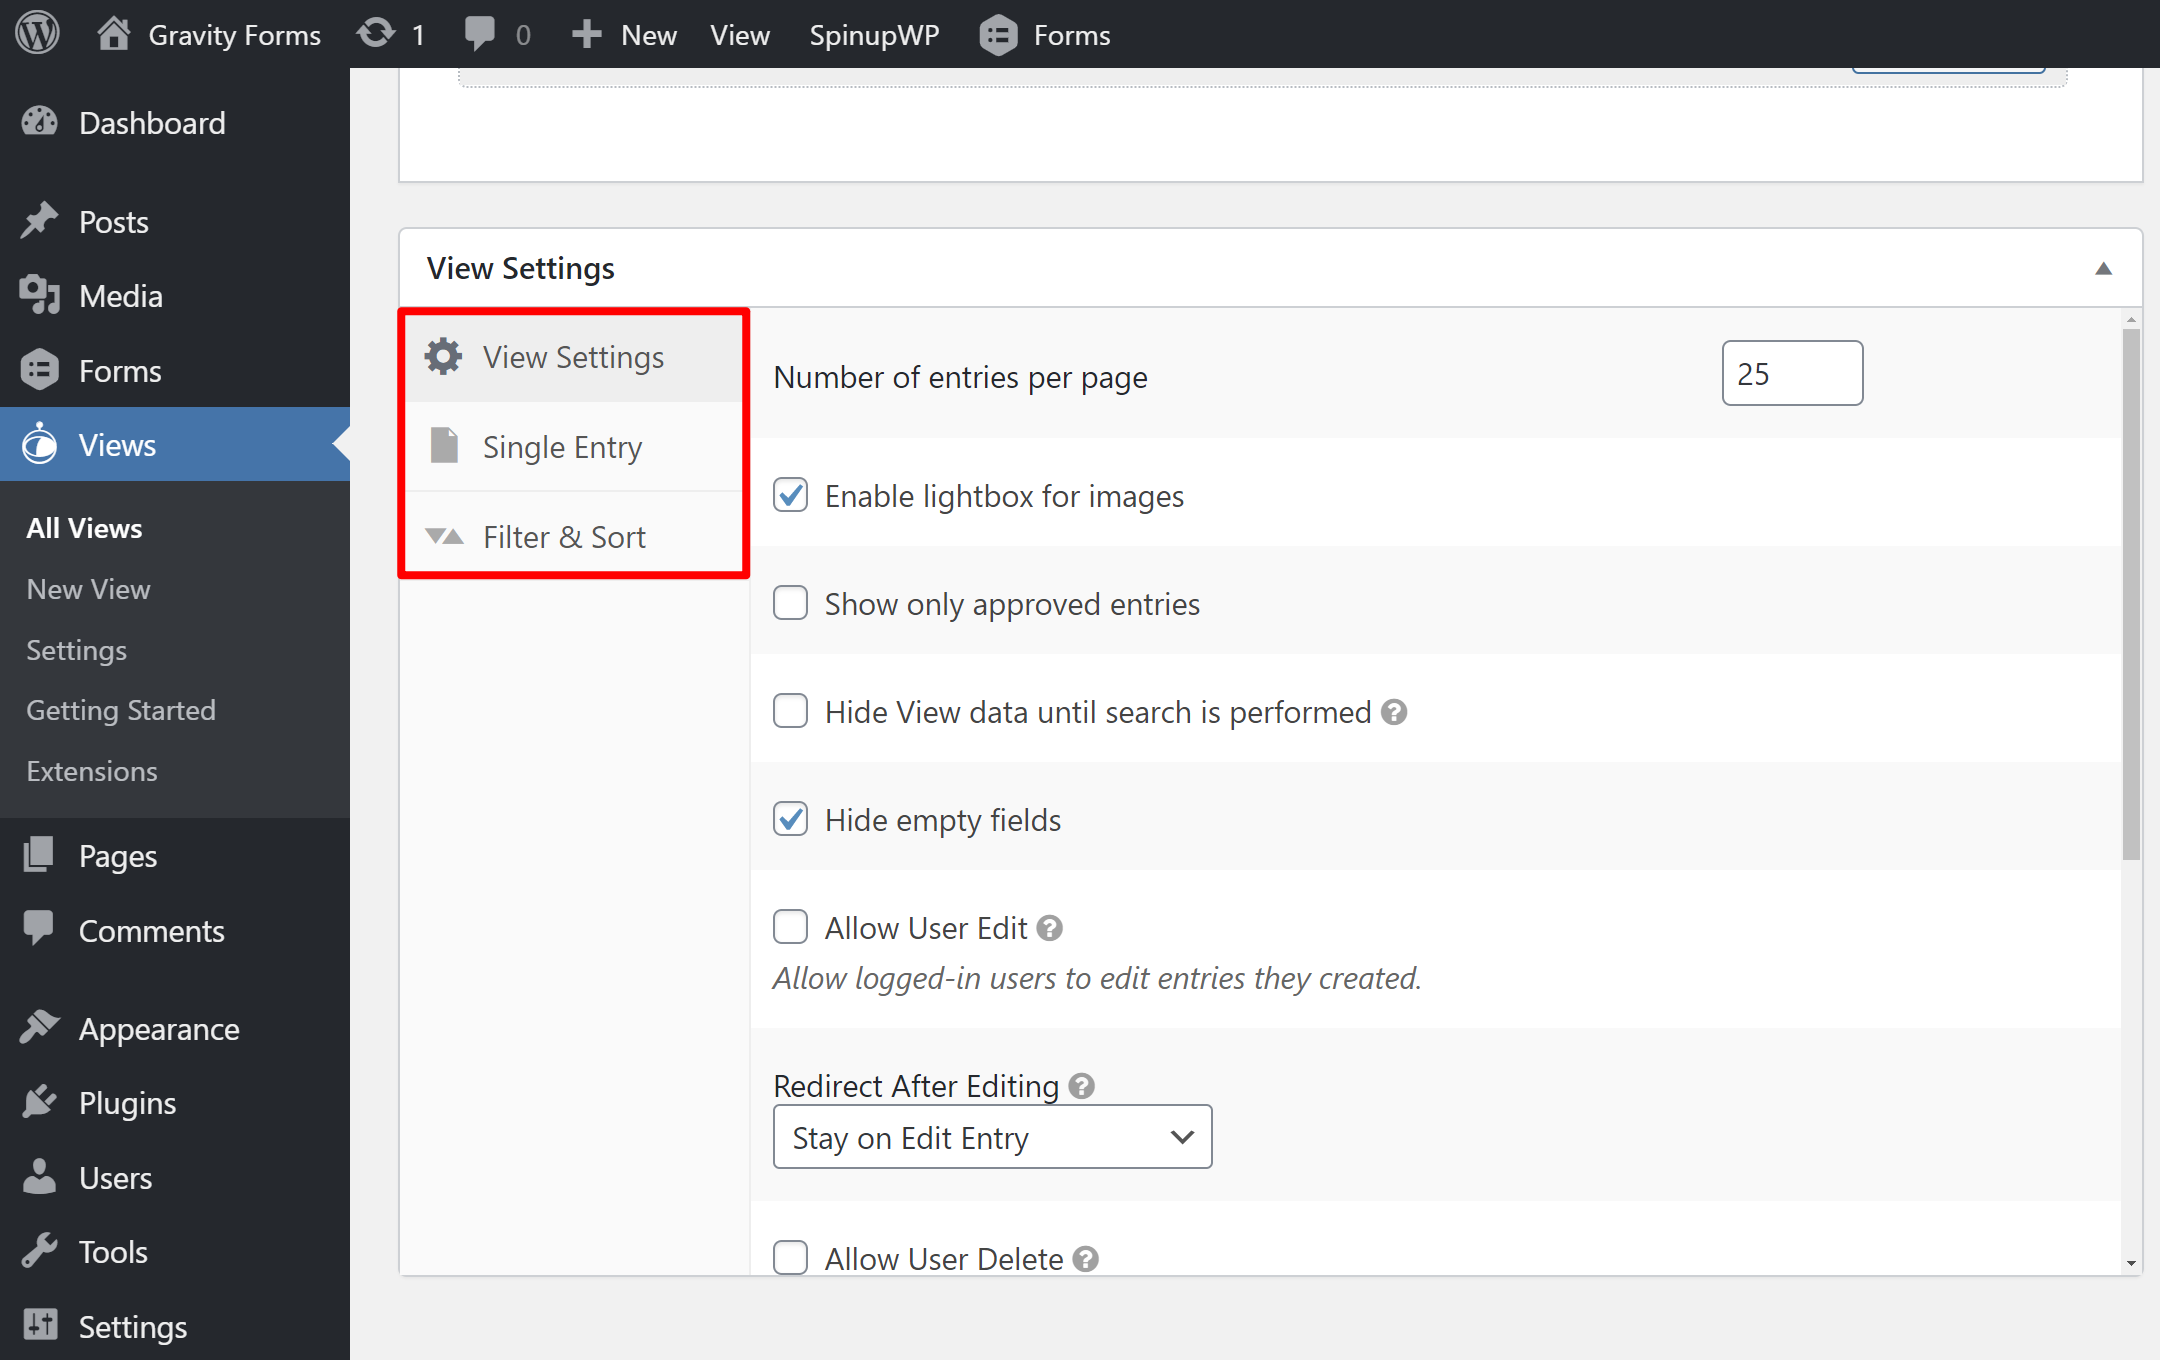
The last thing you need to configure before publishing your view is this See settings.
Here you can configure a number of less general settings, e.g.
- whether empty fields should be hidden or not
- Sorting behavior
- if all the form entries are shown or only the entries that you manually approved
- whether registered users can edit their own records.
And that’s it! With the attached card code, you can now post and display your view anywhere on your site.
Learn more about how a view works
Now that I’ve created a view that accompanies my shape, let’s take a closer look at the interaction between a Gravity Forms shape and a GravityView view.
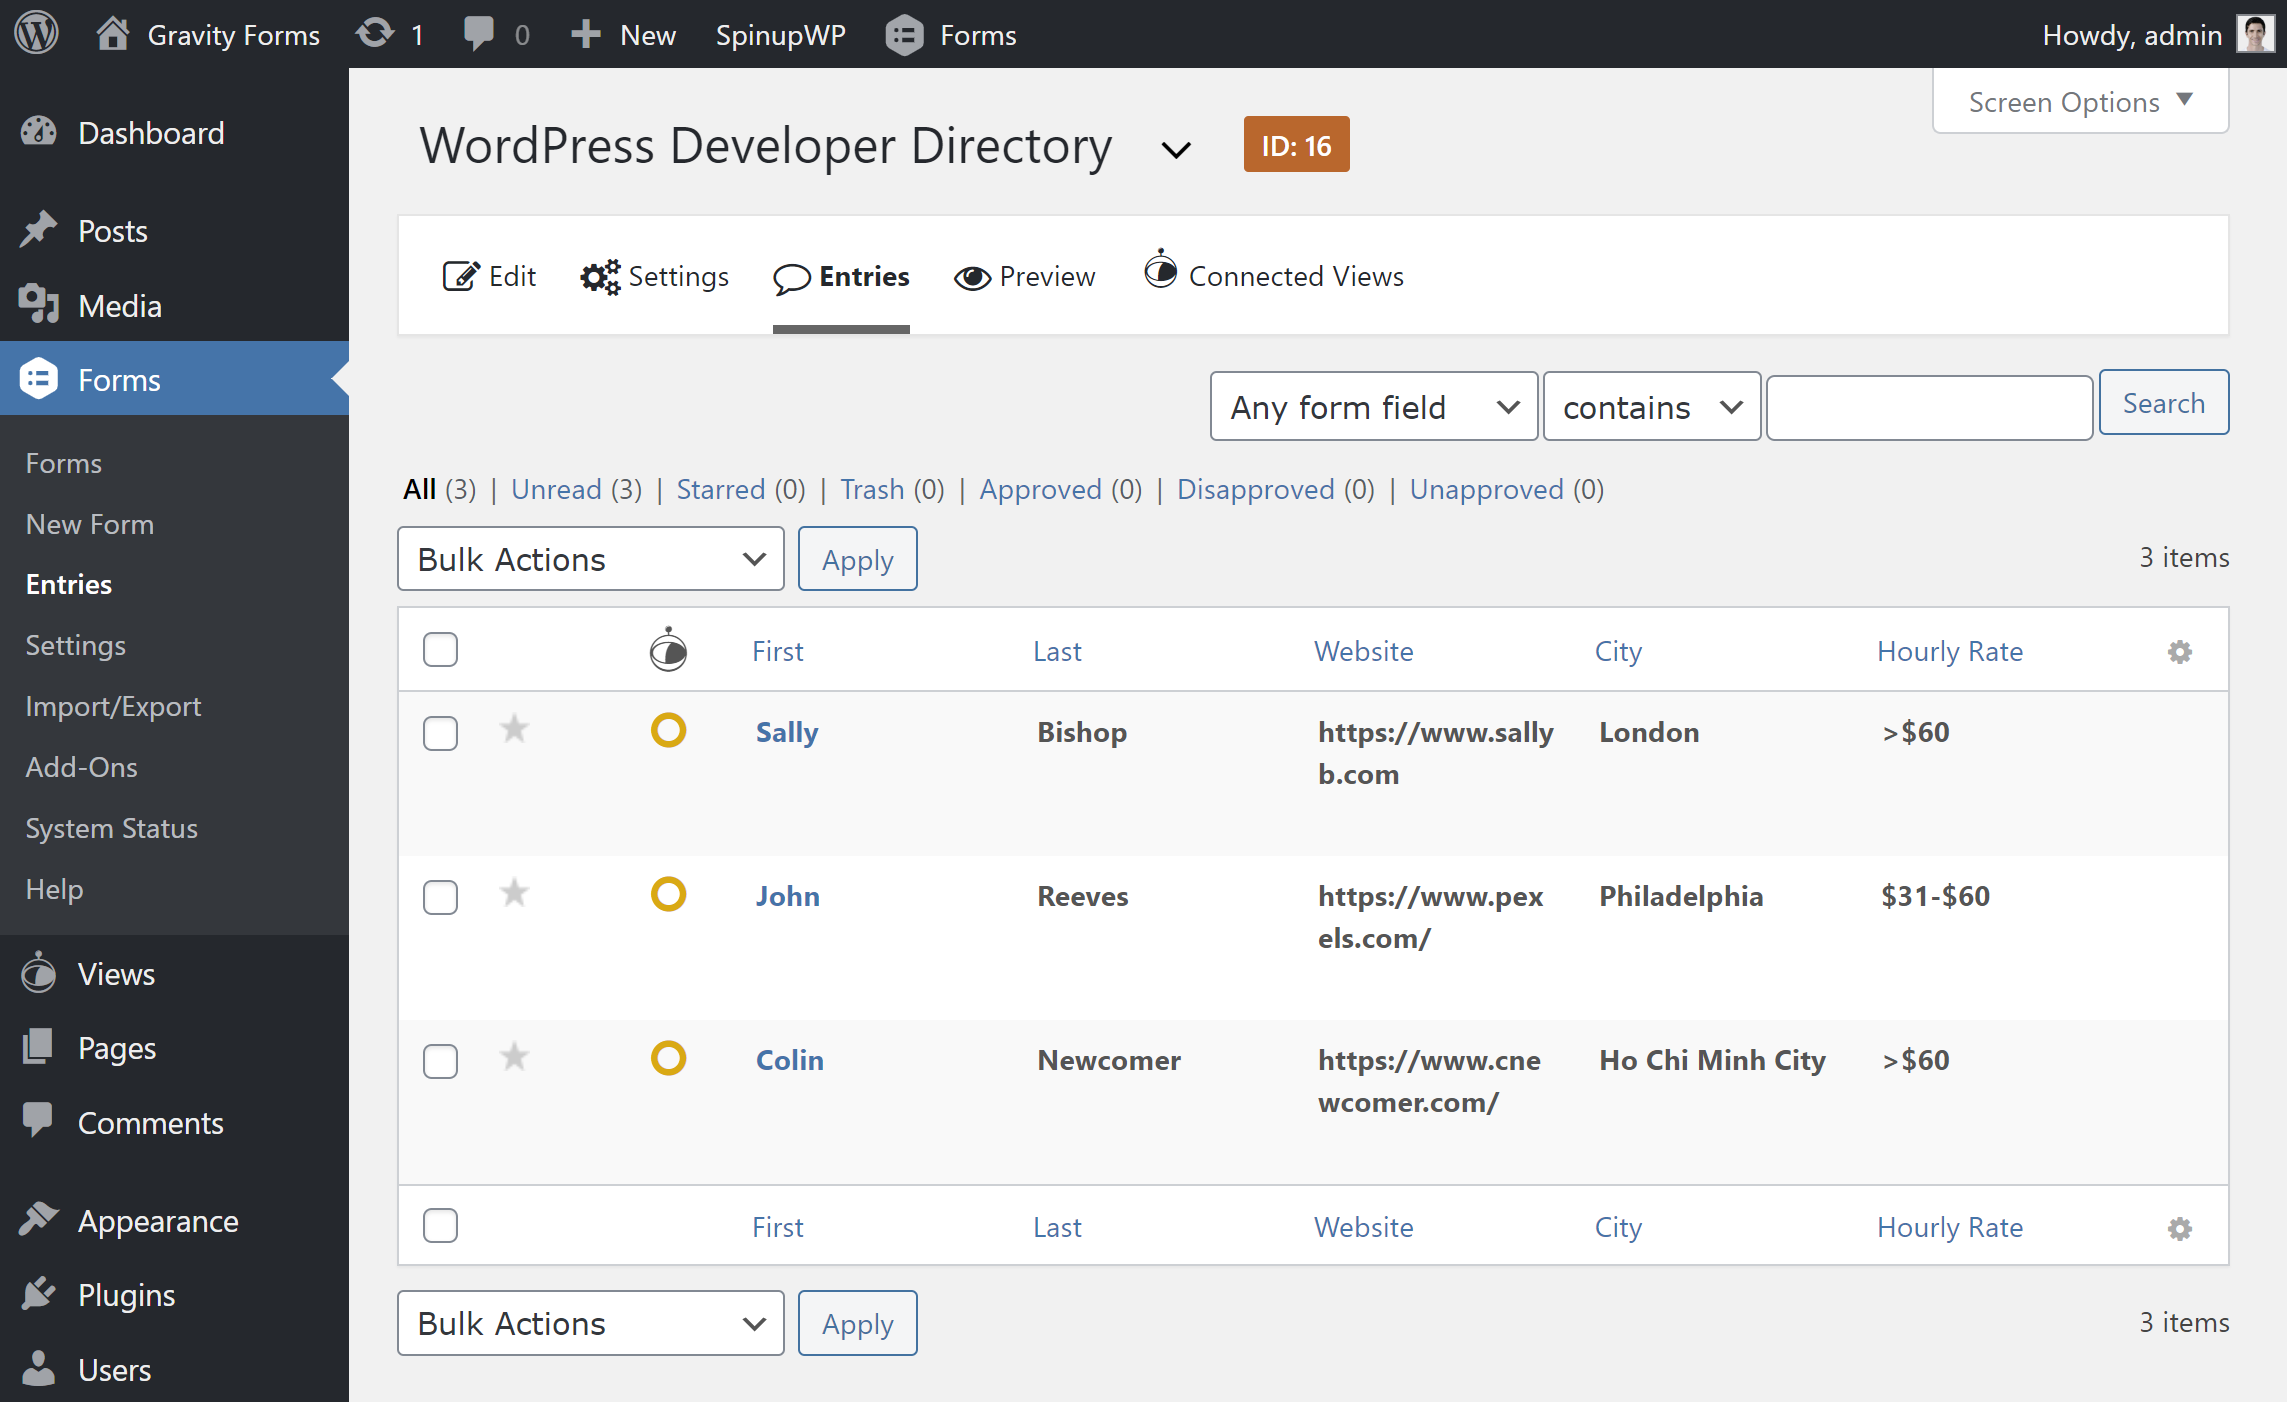
I’ve already shown you the front form of Gravity Forms:
When someone submits data through this form, they appear as an entry in the severity forms. You can see that our sample form contains three entries, each representing a WordPress developer:
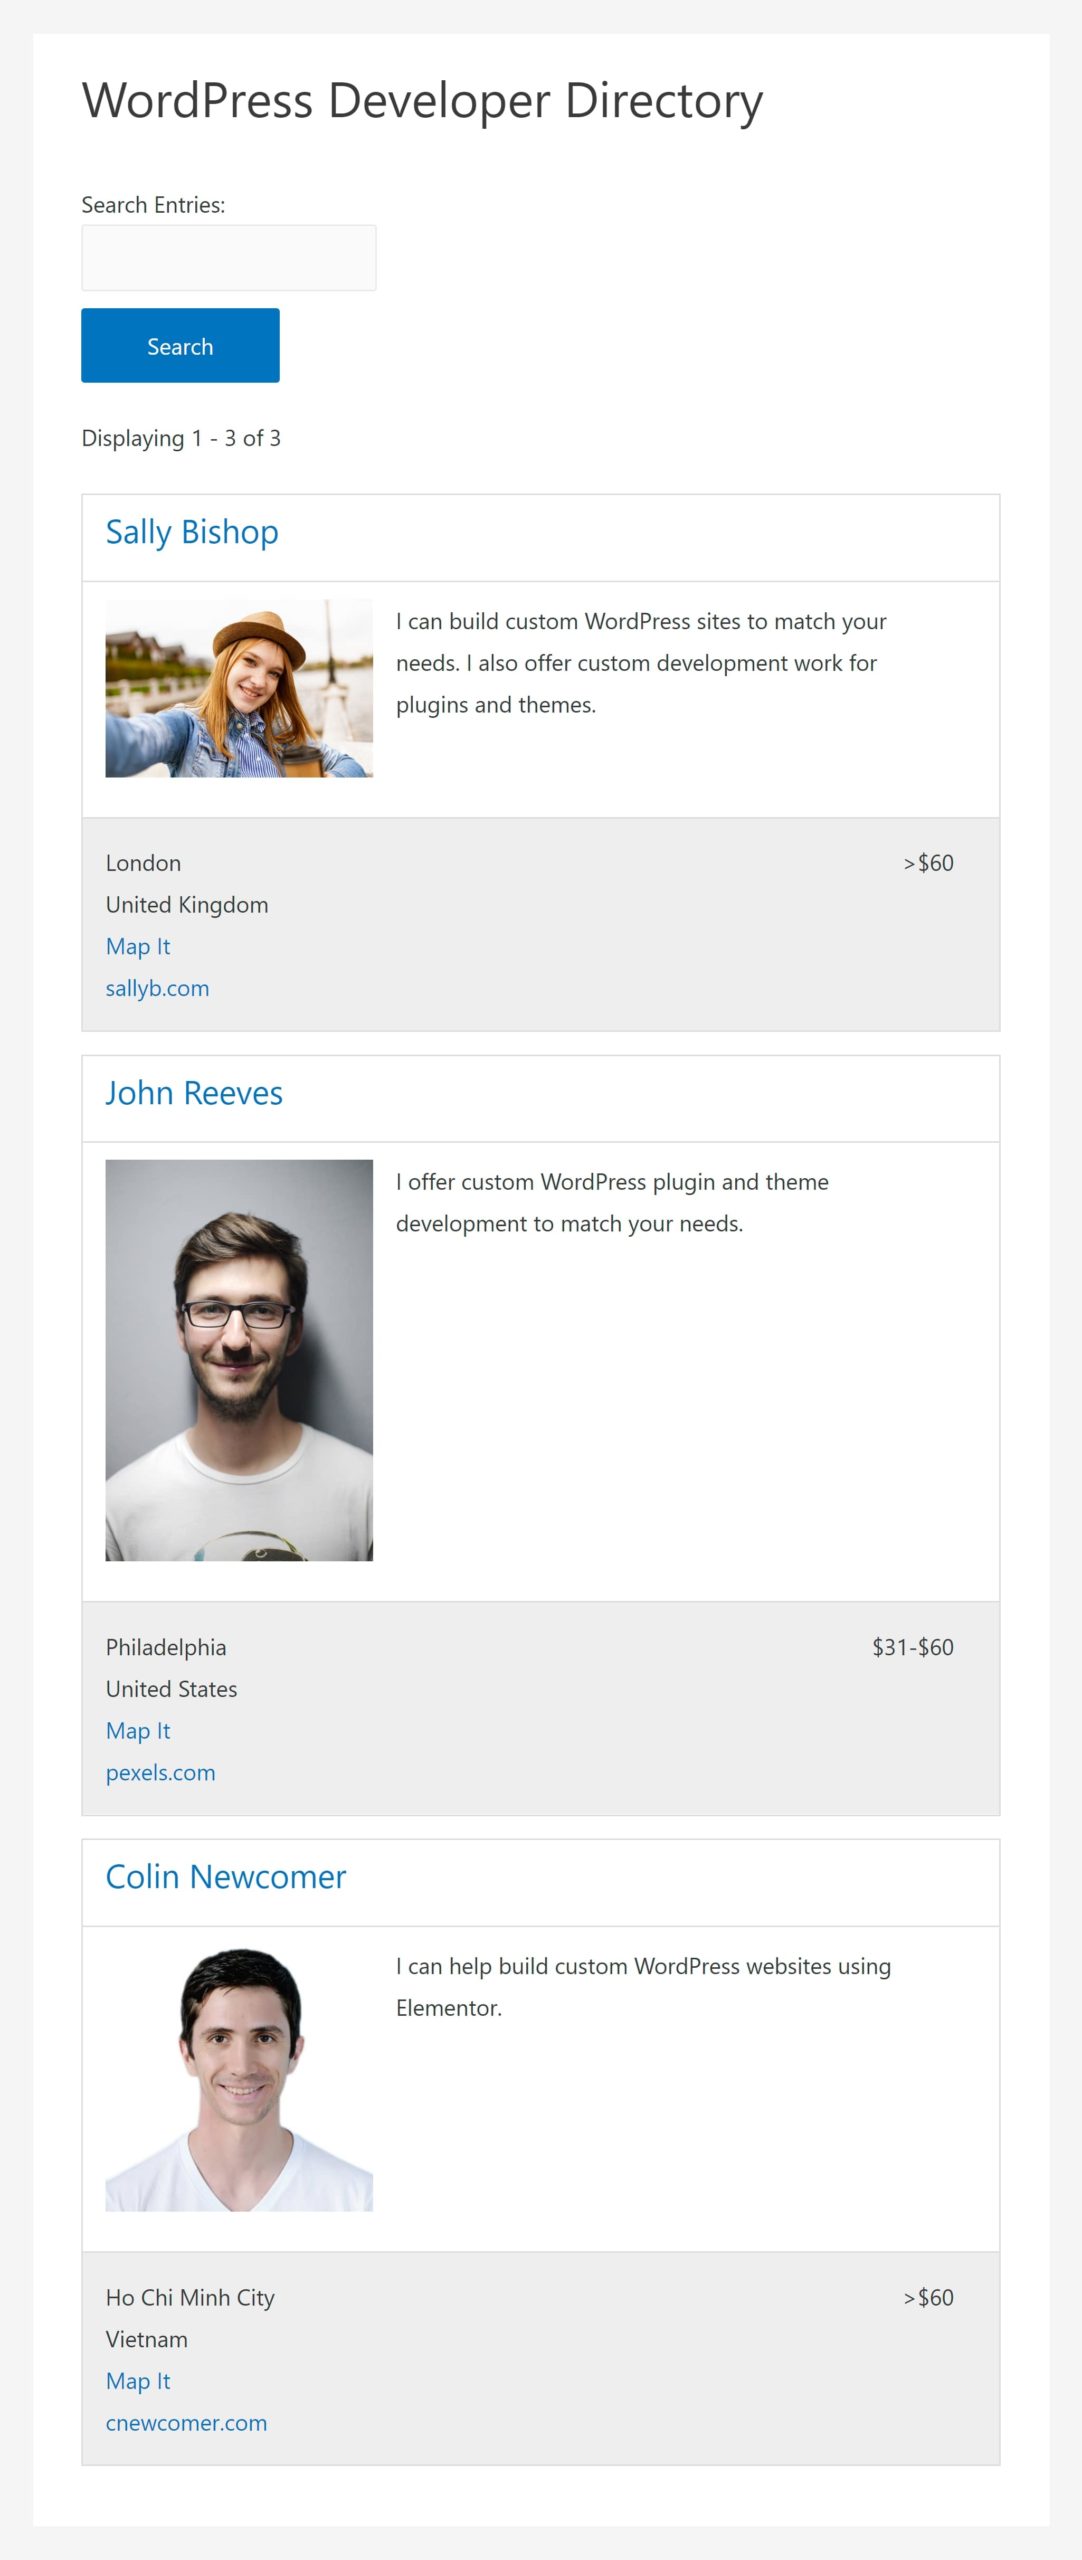
This is where GravityView comes in. On the website where I added the GravityView card code, you can see a list item for each entry in the Gravity Forms. That’s him More ticket templates::
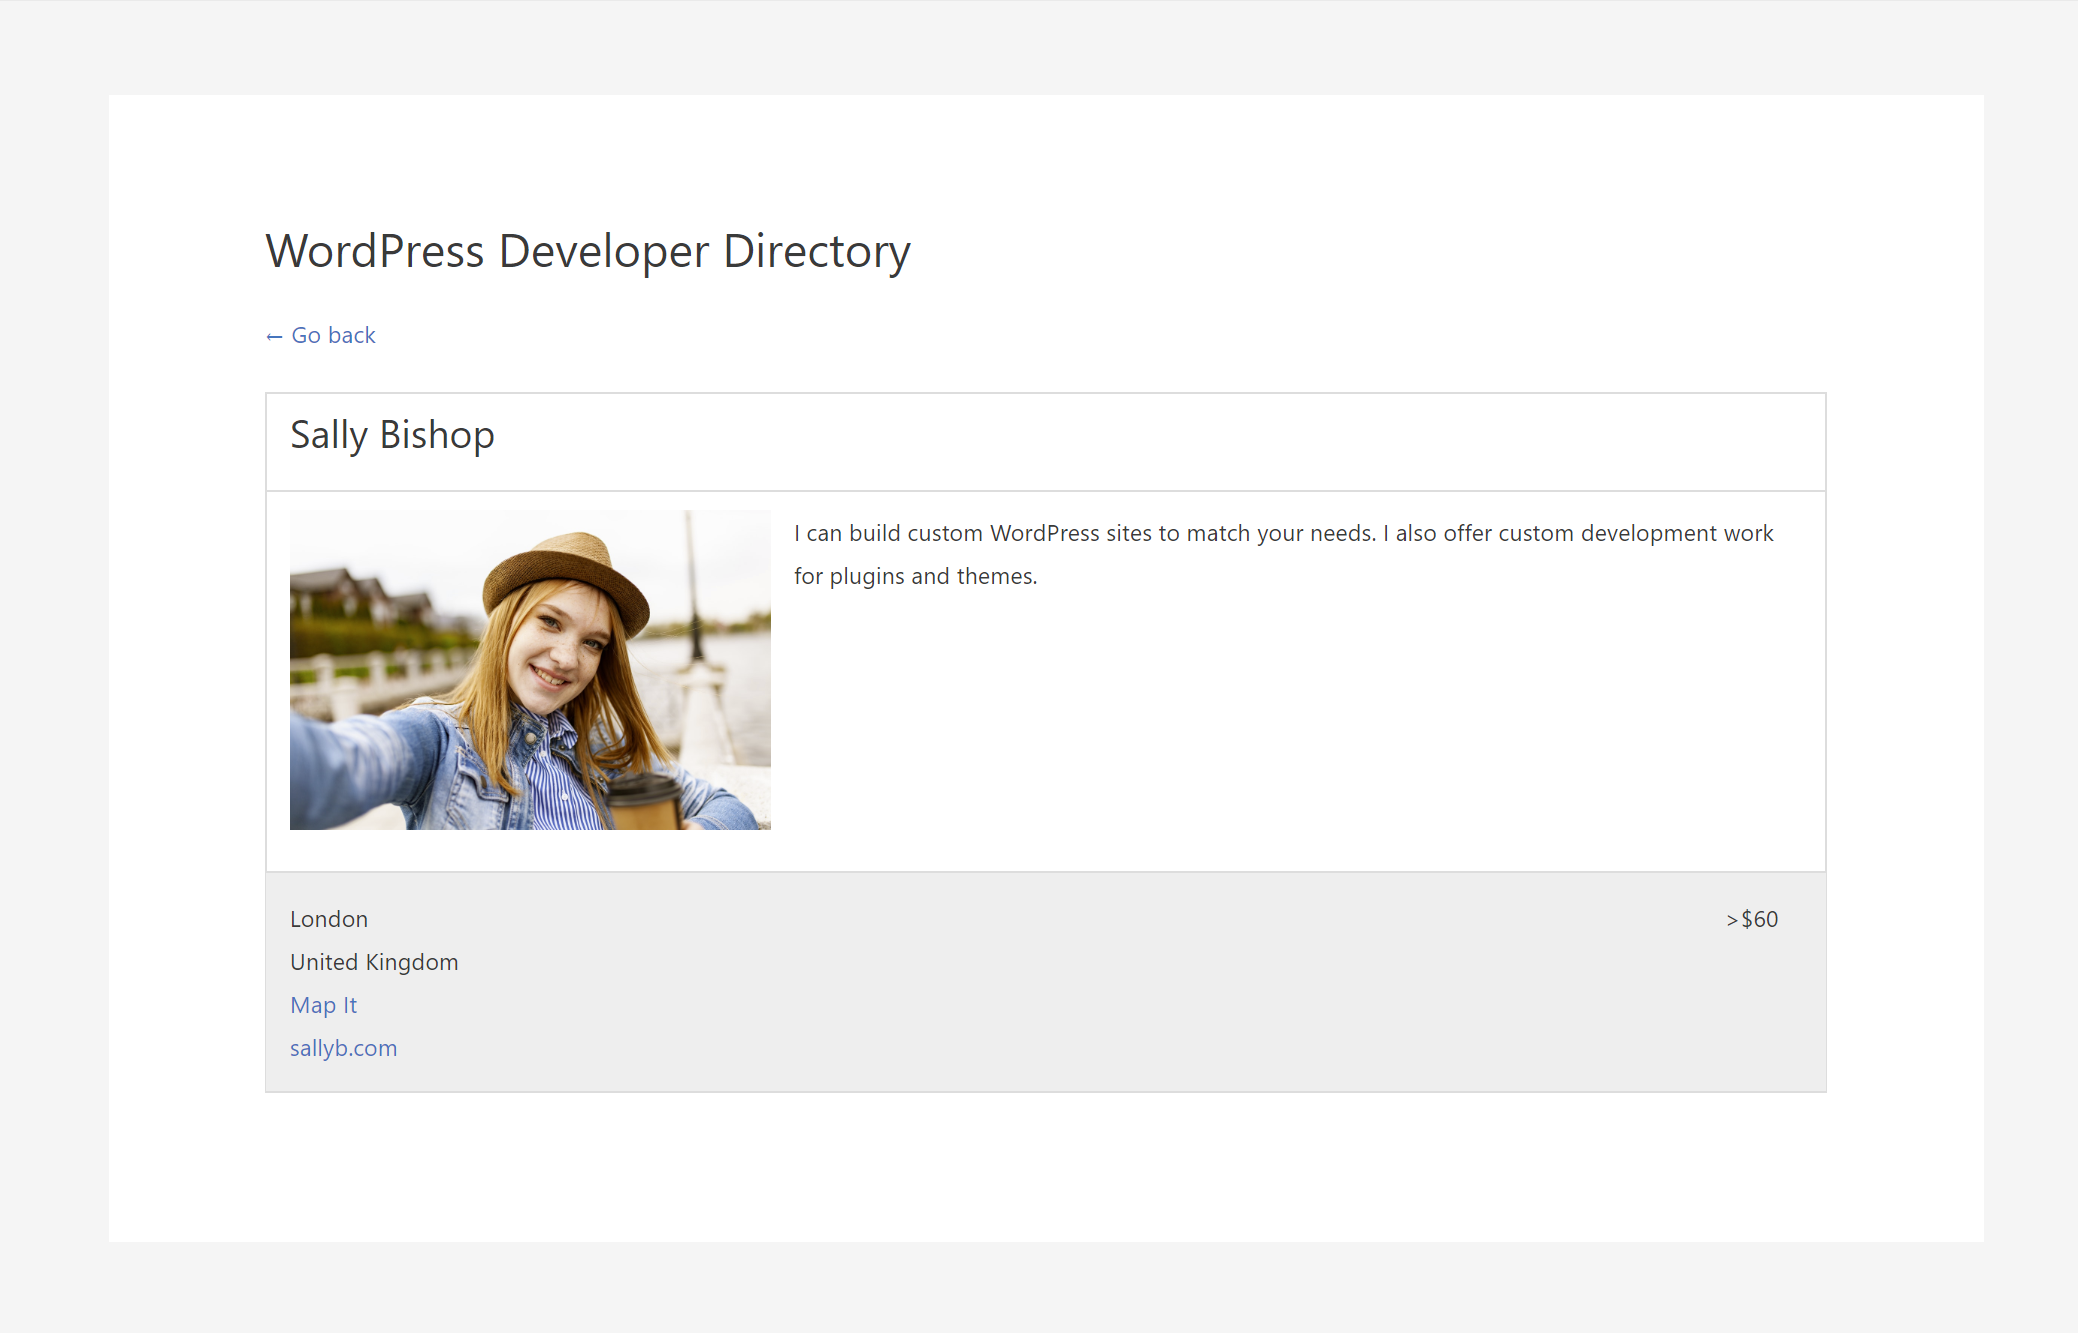
If someone clicks on one of these items, they will be directed to Template with entry to this particular post:
If you enable it, registered users can edit their own contributions through frontend Edit the input template. However, based on the settings described above, you may see people editing the namespace:
And this is how it works! If you are creative, you can create some really good implementations.
GravityView plugins
You can only do everything I’ve shown you before with the largest GravityView plugin. Depending on the plan you have purchased, you can also access additional plug-ins to further expand GravityView functionality.
You can see the full list of plugins here, but here is a brief description of what each plugin allows you to do:
- Import tickets – Bulk import records in the form of gravity using a CSV. Then you can use this data in your views.
- calendar – View entries in a calendar layout. Ideal for locals.
- Online edition – Offers online editing in GravityView and Gravity Forms for faster editing.
- Enter Ratings – View changes to an entry and reset these changes only if necessary.
- Many ways – Create views that display data in different ways.
- DIY design – Create your own designs. This still requires some HTML and CSS knowledge, but the plugin makes the process much easier than usual because you don’t need to edit template files directly.
- maths – Perform mathematical calculations based on the input. .
- short – View records on a card. Ideal for physical location directories.
- Ratings and Comments – Allow visitors to rate and review records Another great opportunity for directory pages. For example, you can allow people to rate local companies or service providers.
- A-Z filter – Get the results filtered by the first letter of each record.
- Selected Entries – – offers certain entries in its display layouts. Ideal for paid catalog lists. You can allow people to submit basic listings for free, and then pay to upgrade to a sponsored listing.
- Share on social networks and SEO – Add buttons for sharing on social networks and advanced SEO options.
- Data tables – integrate with Data tables to create more detailed table layouts.
- Advanced filtration – Check which items appear in your view under extended conditions, eg For example, the user who created a record, search values, user roles, date ranges, and more.
You can purchase the first three extensions independently, while the rest are only available as part of a paid license plan. Speaking of …
GravityView pricing
GravityView is only available in a premium version, there is no free version to play. There are three different pricing plans, each with significant differences in:
- How many sites can GravityView use?
- the plugins you have access to
- How many designs do you have access to?
You can see the characteristics and prices of the image below:
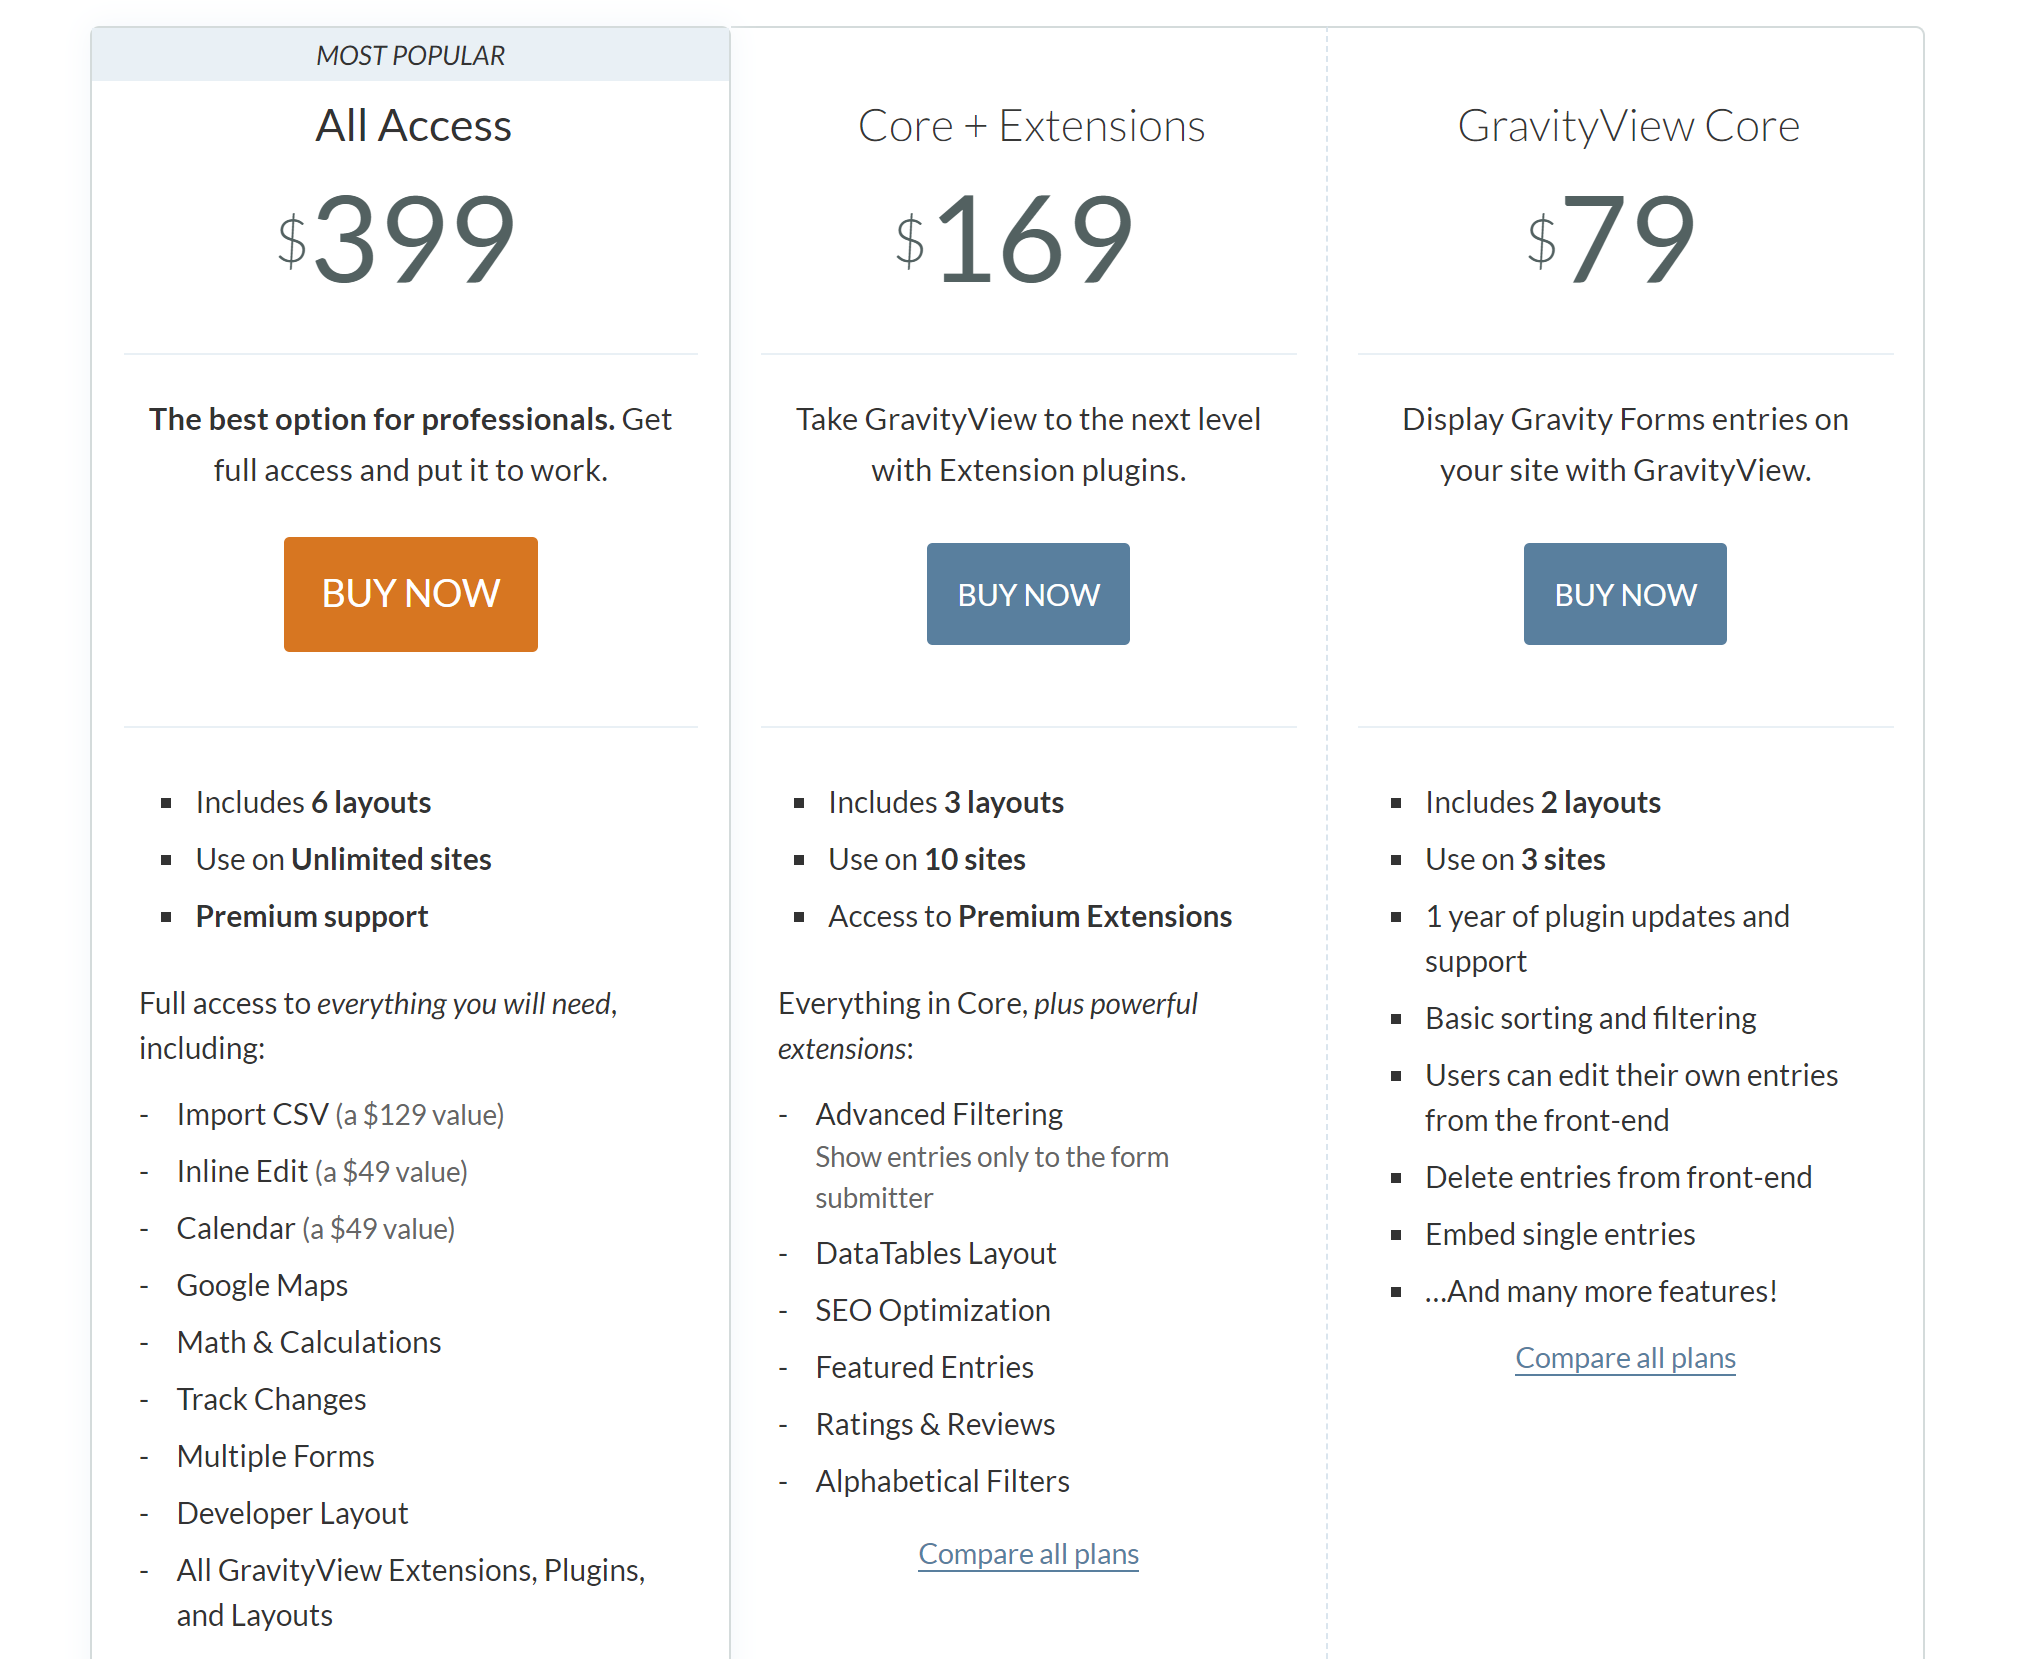
There is also a life plan that costs $ 949. With this plan you have access to everything in the world. All access Plus plan lifetime updates (but only three years of support).
Of course, the GravityView life plan isn’t cheap, but if you use it to build many customer locations, you can spread those costs to all of your customer locations and really save money.
Last thoughts
GravityView is very popular in the gravity world for some reason. In short, it’s the easiest way to get Gravity Forms posts from the front of your site.
There are other options for some use cases, eg. Eg For example, adding records as a custom record type and displaying them on your site is generally not as easy or flexible as using GravityView.
Creating a view is easy and intuitive. More importantly, you don’t need to know PHP, HTML, or CSS unless you want to create your own custom layout. Therefore, you do not have to be a developer to use this tool.
Because Gravity Forms are so flexible, use cases are virtually limitless.
It is an excellent choice for any type of catalog, but you can also use it in other ways. If your use case involves collecting data through a form and displaying it on the front page of your site, GravityView can probably help you get the job done.
Source: https://tech-blogs.com/gravityview-review-what-is-it-what-it-does-is-it-worth-buying-2020/


Leave a Reply