AutomatorWP – Knowledge Base | BuddyBoss Resources
The AutomatorWP plugin lets you connect your WordPress plugins together and create automated workflows. You can create “automations” linked to your WordPress activities and when any of them happen, you can make other things happen accordingly. For example, when a user purchases a WooCommerce product, add a WP Fusion tag to the user OR when a user joins a BuddyPress group, enroll the user in a LearnDash course.
You can also create automations with multiple triggers and actions you want, such as – when a user creates a bbPress forum topic and completes a H5P content, enroll the user in a LifterLMS course, add a MemberPress membership to the user and email user with instructions about how to access to the course.
The FREE plugin features include:
- Unlimited triggers and actions
- Set the number of times required to complete a trigger
- Sequential triggers
- Completion limits
- Tags to pass trigger information to actions
- Developer-friendly with plenty of hooks to add custom features and functionalities
- Built-in support for popular plugins such as BuddyPress, WooCommerce, Easy Digital Downloads, LearnDash, LifterLMS, H5P, GamiPress, and Popup Maker
- Support for common WP triggers and actions –
- Triggers:
- User registers to the site
- User logs in to the site
- User daily visits the site
- User views any/specific post
- User views a post of any/specific category
- User views a post of any/specific tag
- User views any/specific page
- User views a post of any/specific type
- User publishes a post
- User publishes a page
- User publishes a post with any/specific category
- User publishes a post with any/specific tag
- User comments on any/specific post
- User comments on a post of any/specific category
- User comments on a post of any/specific tag
- User comments on any/specific page
- User completes any/specific automation
- Actions
- Send email to a user
- Add, change or remove role to a user
- Create a user
- Set, insert, increment or decrement user meta
- Create a post
- Set, insert, increment or decrement post meta
- Triggers:
The All Access Pass of the plugin includes a plethora of premium integrations such as AffiliateWP, BuddyPress, BuddyBoss Platform, bbPress, MemberPress, WP Fusion, Gravity Forms, The Events Calendar, ActiveMember360, Zapier, LearnDash, WishList Member and much more.
Installing the plugin
To install the plugin:
- Download the FREE AutomatorWP plugin from the link below
https://wordpress.org/plugins/automatorwp/ OR
Buy and download the preferred access pass for the AutomatorWP plugin from the link below
https://automatorwp.com/pricing/ - Extract the downloaded automatorwp.zip file to the WordPress plugins folder yourhostname/wordpress/wp-content/plugins OR
Go to your WordPress Dashboard > Plugins > Add New. Click the Upload Plugin button. Browse to the download file location, select the automatorwp.zip & install the plugin. - Click the Activate Plugin button to activate the AutomatorWP plugin on your website. OR
To activate the plugin on your website site go to WordPress Dashboard > Plugins and then click the Activate button for AutomatorWP.
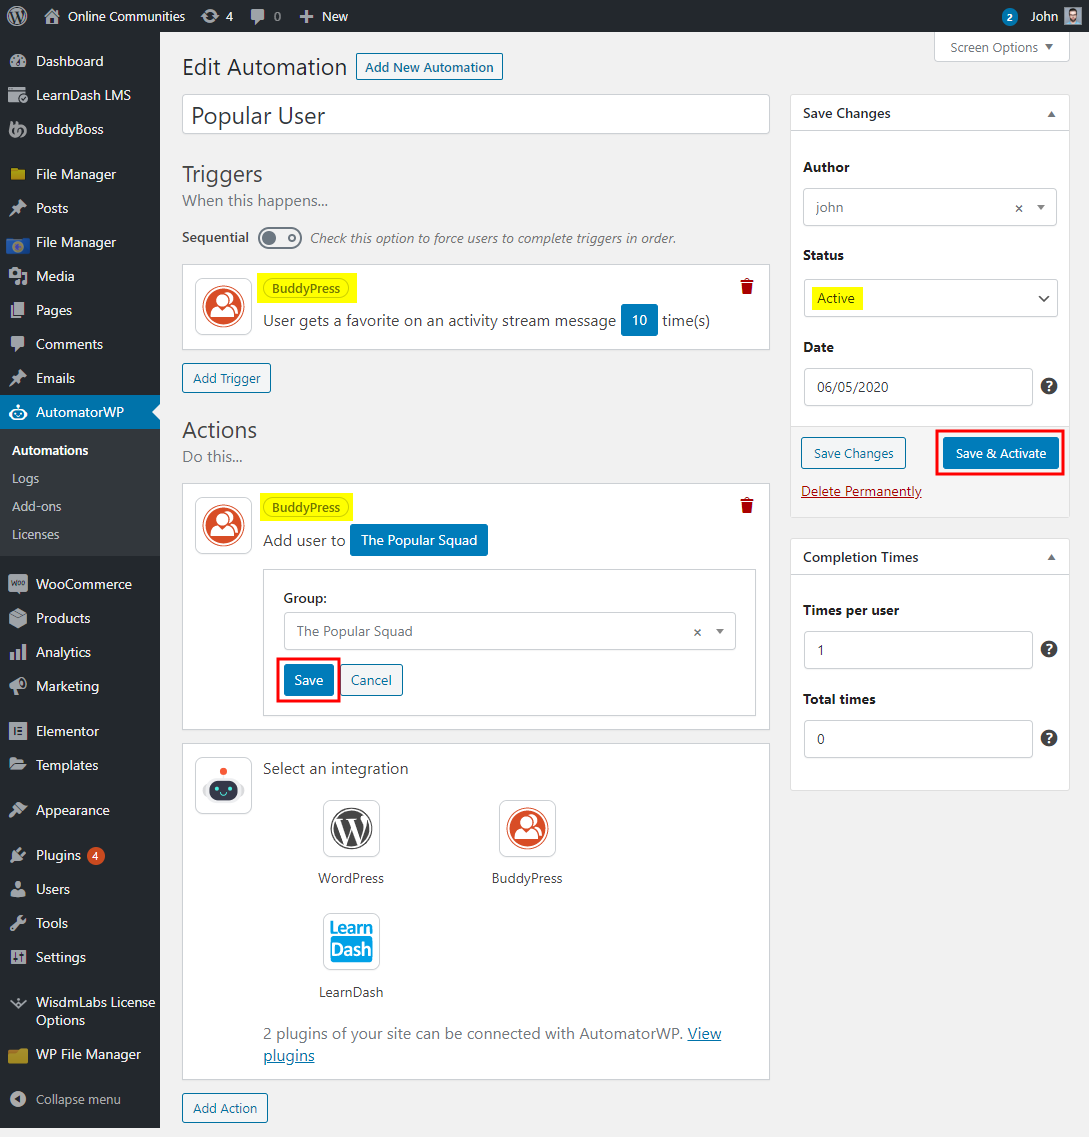
Creating a new automation
Automations are the basic building block of the AutomatorWP WordPress plugin. Every automation has triggers and actions. A trigger is what happens first to tell the site to run an action. An automation effectively tells your WordPress site, “if this happens then do that“. Triggers are the “this” in that example; actions are “that”. To create a new automation:
- Go to WordPress Dashboard > AutomatorWP > Automations and click the Add New Automation button.
- Enter a title for the automation.
- In the Triggers meta box, click the Add Trigger button and select the integration and the trigger for the automation. Click the Save button to save the changes to the trigger.
- In the Actions meta box, click the Add Action button and select the integration and the action for the automation. Click the Save button to save the changes to the action.
- In the Status meta box, select Active.
- Click the Save and Activate button to publish the automation.
Site administrators can view the automations, trigger and action logs in the WordPress Dashboard via WordPress Dashboard > AutomatorWP > Logs.
For further setup and usage tutorials, refer to the official documentation of AutomatorWP.


Leave a Reply