Crocoblock Wizard. Install Everything You Need At Once
As you may know, we go above and beyond in terms of features and platform updates. Crocoblock Wizard makes no exception. In its infancy, the tool was a combination of two separate wizards in Crocoblock. Afterward, they evolved into one robust structure. Today, we are proud to introduce a reworked Crocoblock Wizard that’s extremely powerful and streamlined.
Why You Actually Need Installation Wizard
Are you new to Crocoblock and WordPress in general? Then you might probably not know how to tune them up properly.
Here’s where Crocoblock Wizard comes to rescue. It’s a quick dispatch to get all the functionality installed smartly. You just upload the package, activate the plugin, and run it off the bat.
Another brick in the wall is that Wizard installs a synergy of components in the right order to ensure smooth operation. See, there’s no way you can do something wrong; the plugin takes over and does its best.
That’s one more thing to appreciate, though. Wizard is a decent alternative to WP tools. Our installation pack covers everything from themes and demo content to plugin sets and templates. What does it mean to you? Well, you’ll spend less time on manual-type things and more on actual website building.
Things We Love About Crocoblock Wizard
Long story short, we’ve outlined TOP 5 Wizard perks and you know what? After you test the waters, we bet you’ll appreciate them as well.
Ease – With Crocoblock Installation Wizard, your manual effort is reduced to a minimum. The package can be deployed in several button clicks.
Speed – From the unpacking to thumbnails regeneration, it takes around 5 minutes to get all products installed.
Versatility – Crocoblock installation, skin import/export, Interactive Popup Library – pick any installation type, and the Wizard runs the chosen scenario.
Logic – You don’t have to do the thinking, our Wizard knows exactly what to install, how, and when. You simply get the ball rolling and enjoy a neat WP architecture afterward.
Transparency – We decided not to hide the routine, quite the opposite. Each step is clear-cut and comprehensive; you see what is done and for what purpose.
How to Install Crocoblock with Wizard
Before you reach the actual welcome screen, you ought to do some preparations. First things first, create a backup copy of your current website – it’s a must. If anything goes wrong, you’ll still have a chance to fix what’s been broken. Next, go to your Crocoblock account and download the Installation Wizard. Copy the license key to the clipboard because you’ll need it to start the installation. Proceed to the Plugins tabs in your WordPress dashboard and upload the package.
Once uploaded, the system will ask you to activate the plugin. Do so to spot the thing we all have gathered here for – a lovely Crocoblock Wizard welcome screen.
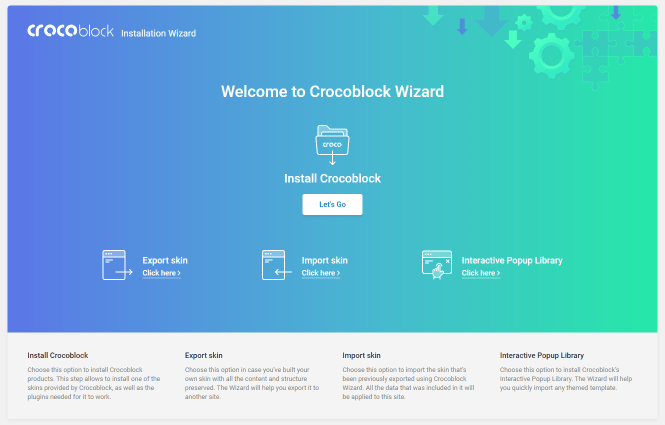
As you can see, there are four installation options on offer. Let’s do a once-over, shall we?
#1 Installing the Crocoblock package
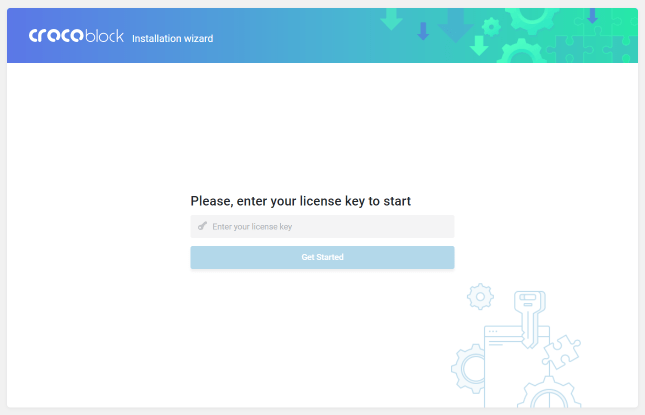
Once you hit the “Let’s Go” button, the Wizard will ask you to enter your license key.
Submit it to unlock two possible installation types: Full Crocoblock installation and JetPlugins. By choosing the first option, you’ll be installing the entirety of Crocoblock products like plugins, themes, and templates. But if you choose JetPlugins, the Wizard will skip the installation of themes and templates proceeding straight to the plugin installation page. Read more about how to install plugins.
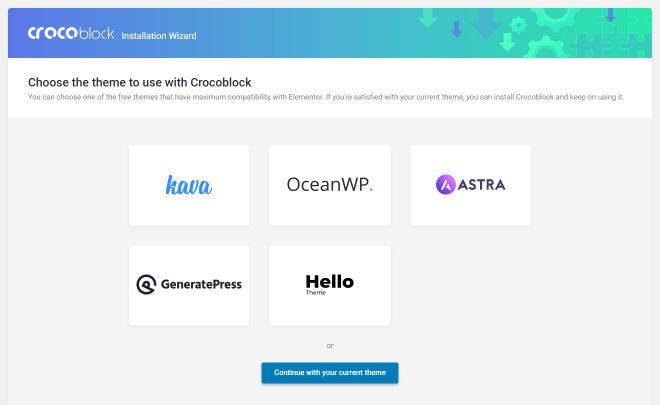
Choosing a theme
Next, pick one of five suggested themes. We offer you these because they are most compatible with Elementor. If you are satisfied with the theme already in use, just press the “Go with current theme” button, and your website’s exterior will remain untouched.
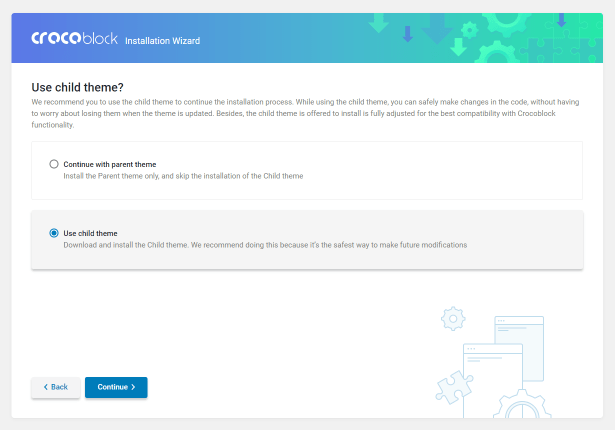
Previously, to work with other themes but Kava, you had to install the JetThemeCore Compatibility kit for your headers and footers to be displayed correctly. The problem was solved with the launch of child themes for the most used themes, such as Ocean WP, Astra, GeneratePress, and Hello Theme.
Why the child theme generator? Basically, it’s a lifeline for those of you who are big on coding. If you like digging in CSS but can’t always be sure this is safe enough, stick to the child theme. It will ensure the changes you make won’t have a toll on the main theme settings and plugin functioning whatsoever.
Selecting a template
Now, it is possible to install any dynamic or design template. You pick a new theme or go with the current one, and then install the template – it’ll work just fine. So far, we’ve got 7 dynamic and 47 design templates to choose from.
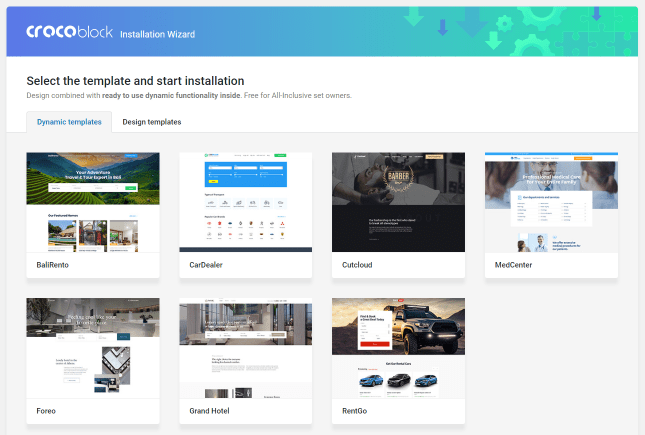
What we like about Dynamic Templates is the fact these are fully operative marketplaces. Every tiny element—from custom post types and taxonomies to listing grids, filters, and singles—is tuned and ready to use. You just grab a template you fancy and adjust it to your needs. All blocks, pages, listings, and even the website logic can be customized freely.
As to Design Templates, these are pre-designed static pages boasting no dynamic functionality. It is definitely the way to go if you get to create a landing page, a small portfolio or a business card website, or even a blog. Any kind of web development project that is all about design. But if you want to bring it up a notch, you’ll have to set up the dynamic stuff manually.
NOTE: Please note that Dynamic Templates and Design Templates are free for All-Inclusive set owners. If you have any other subscription plan, it’s advisable to upgrade to All-Inclusive.
Installing the plugins
The next step is plugin installation, and there are two tabs available there. Required plugins are indispensable for the proper functioning of both design and dynamic templates, so make sure to get them all installed. Extra plugins stand for additional functionality you can add to your website. You can pick some or none of these – the result will be equally satisfying.
Importing demo content
Plugins installed, it’s time for the demo content import. It can be appended to your existing site content or overwrite it. If you choose to append, the process launches right away and doesn’t affect your existing site content. Overwriting means that ALL the data you have will be removed once and for all. See, that’s what a backup copy is for. ? If you still want to overwrite, make sure to confirm your choice by entering the WP user password.
Regenerating thumbnails
A second-to-last step is thumbnails regeneration. The process may take a while, so you just wait for it – none actions required.
Whoosh! And Crocoblock products are installed in a matter of several minutes. Take a look at your newly-created website, delve into page editing, or go to Crocoblock Dashboard, you rebel. ?
#2 Exporting skins
Imagine you’ve built your own skin and want it exported to another site. Crocoblock Wizard will help you do it safely, preserving the structure, content, and settings as well. You can also choose plugins for export if you want.
#3 Importing skins
That’s the opposite of the previous case scenario. You’ve got a skin and want to import it from one website to another. All the data included in it will be carefully applied to this site thanks to Installation Wizard.
#4 Unlocking Interactive Popup Library
Last but not least, this section opens up a library of 50+ interactive pop-ups that you can use to decorate your site. Spooky, funky, cute, or tricky – which are you big on today? Our Wizard will help you import any template in next to no time. Customize it a little bit and fit into any website section, just like that!
What If I Need to Run Crocoblock Wizard Once More?
Nothing can stop you! Our Installation Wizard is available in two directories.
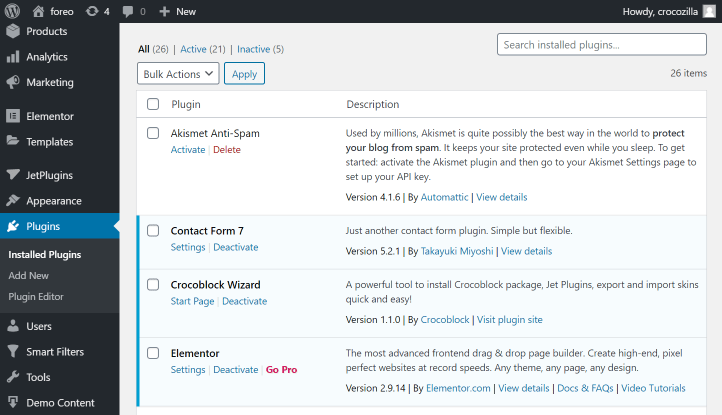
Mouse over JetPlugins in the WP admin panel and you’ll see a drop-down list. The latter item on it would be “Installation Wizard.”
Go to Plugins > Installed Plugins and find Crocoblock Wizard amid all plugins. See a small caption under it saying “Start Page”? Hit it to see the welcome screen.
Bottom Line
Clear-cut, versatile, and reliable – these three words describe Crocoblock Installation Wizard best. There are 4 installation options to cater to everybody’s needs. It ensures every component goes into the right directory at the right moment. It protects you from losing theme settings. Finally, it helps you install everything at once. You do the math. ?



Leave a Reply