How To Create A WordPress Staging Site For Testing – 3 Best Methods
Managing a WordPress blog is fun yet easy. However, this changes when you start attracting high traffic and downtime is something you can’t afford anymore. No matter how careful you are, you could make a change that breaks your site, which is bad for both your visitors and your site’s SEO.
Instead of risking a change on your LIVE site, you need a safe place where you can test out changes before you make them available to the public. If you are someone who likes to add new plugins or make regular changes in your theme, you will love the Staging feature.
Staging is a popular word that means “the method of presenting a play or other dramatic performance”.
A staging site allows you to do just that. It is a private replica of your live WordPress site that you can test the changes on. Once you’ve tested the change and are sure of it, you can make it available to your visitors on the live site without any worry. Be it adding a new WordPress plugin, testing new codes or making changes in WordPress theme, you can do all of it on your staging site and then make it live with just one click!
Staging is not a new feature and I have been wanting to talk about this for a while now given 9Blogging users who are using WordPress are bound to find it extremely helpful. To help you create a staging site for your blog, I’ll show you three different ways and also tell you which method I think is the best!
Option 1: Choose A Host With A Staging Feature
The easiest, and often the best way to create a WordPress staging site is by choosing a host that offers a dedicated staging feature.
While the two other methods that I will show you do let you create a staging site on any host, neither of those methods offers the same level of functionality or are as easy to use.
Here are some specific features that most hosts offer that makes staging a lot easier:
- One-click push: This lets you move the staging version of your site easily to the live server and vice versa.
- Automatic backups: Some hosts like Kinsta automatically back up your site whenever you make your staging site live to give you more security.
- SEO-friendly safeguards: Hosts automatically put in place SEO safeguards to prevent any duplicate content issues and keep your staging site private.
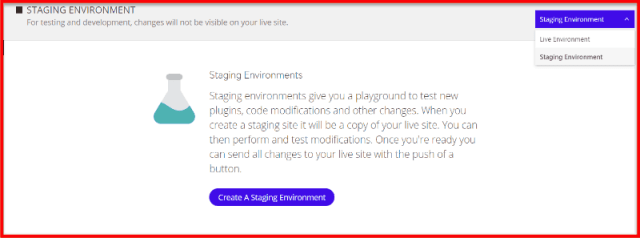
If you’re looking for a WordPress host with built-in staging functionality, here are some good options.
- Kinsta – Kinsta offers a great staging feature that makes it easy to push content back and forth. It also automates the backup process.
- WP Engine – Like Kinsta, WP Engine provides an easy-to-use staging feature that’s accessible right from your WordPress dashboard. For more information, as well as some of my negative thoughts on WP Engine.
- SiteGround – SiteGround offers a dedicated staging feature…but only in its highest-tier GoGeek WordPress hosting plan.
If a host with a dedicated staging feature isn’t an option, here are two other ways to get the job done.
Option 2. Use The WP Staging Plugin To Create A Staging Site From Your Dashboard
WP Staging is a freemium plugin that lets you create a staging site easily even if your host doesn’t offer it.
It’s pretty easy to use and actually captures many of the same benefits of the built-in staging sites discussed above:
- All you do is click a button to create your staging site.
- It’s SEO-friendly because it hides the staging version of your site from search engines and other visitors.
While there is a free version, it has one big limitation:
There’s no button to automatically push your changes from staging to live site. Therefore, while it’s easy to create a staging site, you’ll need to manually make the changes on your live site again, unless you pay for WP Staging Pro, which starts at €89.00.
How To Use The Free Version Of WP Staging
Here’s how easy it is to use the free version of WP Staging.
First, I recommend taking a recent backup of your site, just in case something goes wrong Even though I’ve never faced any issue, it is better to be safe than sorry.
Then, you can install and activate the plugin like any regular WordPress plugin.
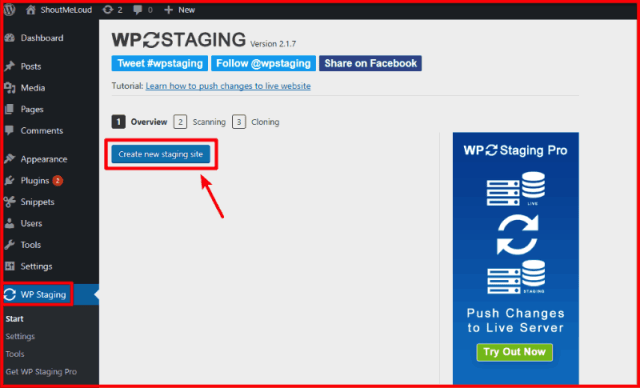
Once you’ve done that, go to the new WP Staging tab in your WordPress dashboard and click Create new staging site:
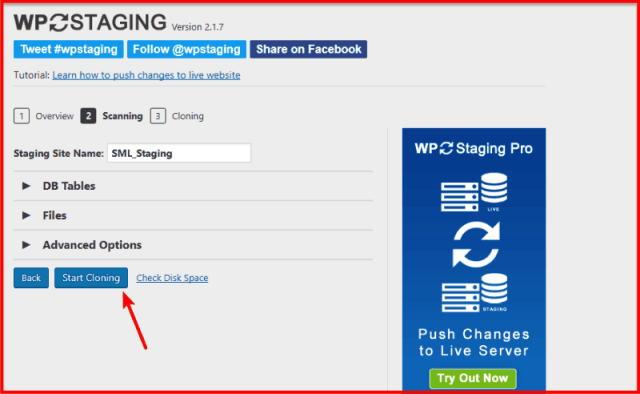
Give your staging site a name and click Start Cloning:
The plugin will go through the cloning process automatically. When it finishes, you should see a button that will take you to the staging version of your site:
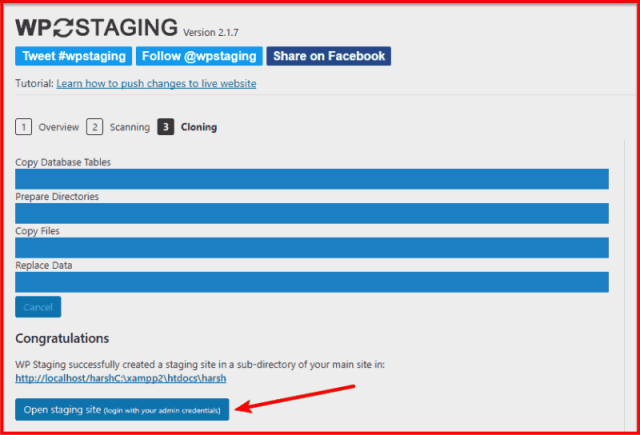
When you go to your staging site, you’ll need to log in using the same WordPress admin credentials as your live site.
You can then start making changes to your staging site safely. WP Staging will always make it easy to tell that you’re on your staging site by turning the admin toolbar orange:
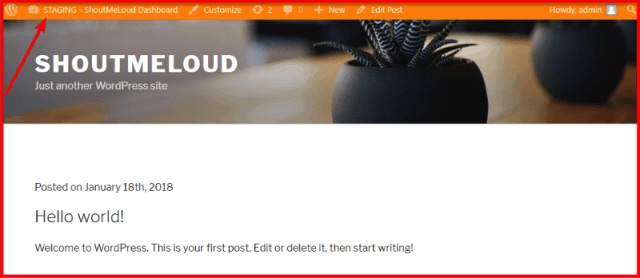
Because this site is private to both search engines and anonymous visitors, you don’t have to worry about any duplicate content issues.
Just remember – if you want to be able to automatically transfer changes on your staging site to the live version of your site, you will need to pay for the Pro version of WP Staging.
3. Use The Duplicator Plugin To Manually Create A Staging Site
If you’re willing to put in some manual work, you can also use the popular Duplicator plugin to create a WordPress staging site.
Duplicator is technically a WordPress migration plugin. But because it makes it so easy to migrate a website, you can use it to migrate back-and-forth between live and staging sites.
I have already written a post on how to use the Duplicator plugin to migrate a WordPress site, so I’m not going to give you a tutorial on that again.
But I will share some tips on how to apply Duplicator, specifically to staging.
First, I’d recommend you to create your staging site on a subdomain of your domain, like staging.yourdomain.com. Read more about subdomains here.
Once you have your subdomain, use Duplicator to create an identical copy of your live site on the staging subdomain.
Then, you just need to make the subdomain private to ensure that neither Google nor nosy website visitors can access your staging site.
To be really safe, I recommend two things:
- Add noindex tag to your staging site to make sure there’s no chance Google indexes it. To do that, go to Settings → Reading and check the box for Discourage search engines from indexing this site:
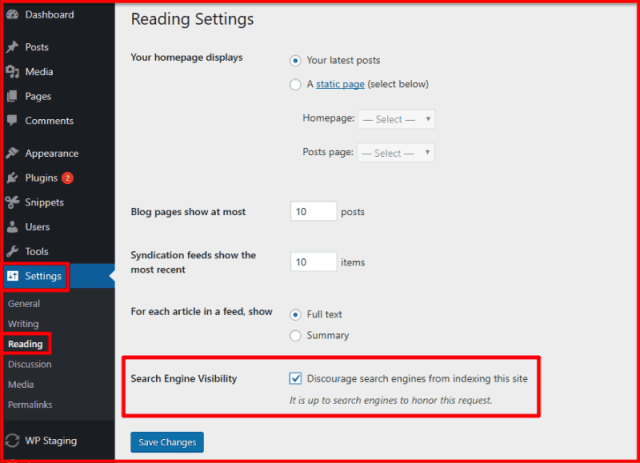
Remember, only do this on your staging site – NOT on your live site.
- Use a plugin like Hide My Site to password protect your entire WordPress staging site. Or, you can also use the .htaccess file to limit access to just your IP address, though this method is a little more advanced.
Performing both these actions will ensure that your staging site stays 100% private.
The Easiest Way To Create A WordPress Staging Site
If possible, choosing a host with a built-in staging feature is the best way to get access to a WordPress staging site. For that, I recommend Kinsta or SiteGround, depending on your budget and how many sites you need to host.
If that isn’t an option, the WP Staging plugin provides another user-friendly method. Just remember that you need to pay for the Pro version to automatically make your staging site live.
And finally, if you want something that’s 100% free, you can always use the Duplicator plugin. Just remember that this method requires more manual work and is also technically complicated.
As per my Workflow, I use Kinsta’s hosting staging feature. Earlier I used it on WPEngine but Kinsta has taken the staging feature to a different level altogether. It would be great if you could host your WordPress site on a web-hosting that offers staging features by default. Else, you can use either of the recommended solution.
With time, if I discover better and easier to use solutions for creating a staging site, I will share that with you. But for now I want to hear from you. Do you use a staging site for your blog? Why or why not?
Please use the comments section below to share your opinion.


Leave a Reply